How to test shoe comfort: practical steps for healthier feet
TL;DR:
- Proper shoe fit can be confirmed with simple practical tests like toe space and heel slippage checks.
- Comfort-based shoe testing is supported by evidence and is more predictive of foot health than sole reliance on technical specs.
- Essential considerations include fitting in the late afternoon, using intended socks, and evaluating stability and material quality.
You’ve probably felt it before: that dull ache creeping up from your heels by mid-afternoon, or the sharp pinch across your toes after a long day on your feet. Poorly fitting shoes are one of the most common and most preventable causes of foot discomfort. The good news is that core practical tests such as checking toe space, heel slippage, and the flex point can tell you almost everything you need to know before you commit to a pair. This guide walks you through every step, from preparation to final judgement, so you can make confident, health-informed choices every time you buy footwear.
Table of Contents
- What you need before testing shoe comfort
- Step-by-step practical comfort tests
- Stability, materials, and edge-case checks
- Foot type, expert tests and injury prevention
- A fresh perspective: why subjective comfort beats technical specs
- Try comfort-enhancing shoes and expert resources
- Frequently asked questions
Key Takeaways
| Point | Details |
|---|---|
| Test when feet are swollen | Measure and test shoes in the late afternoon so you account for daily foot swelling. |
| Run step-by-step comfort tests | Follow thumb-width, heel, flex and walking checks to spot hidden discomfort before buying. |
| Stability and material matter | Good heel structure and breathable material improve everyday wear and prevent foot issues. |
| Foot type guides—not dictates | Match shoes to arch and wear pattern, but prioritise personal comfort above biomechanical fit. |
| Replace shoes before discomfort | Swap out worn shoes at 300–500 miles or when the midsole and heel counter lose support. |
What you need before testing shoe comfort
Before you even slip a shoe on, a little preparation makes the difference between a test that reveals genuine fit and one that gives you a false sense of security. Most people skip this stage entirely, which is exactly why so many shoes end up unworn at the back of the wardrobe.
The single most important timing rule is this: measure feet standing in the late afternoon or evening, when your feet are at their most swollen. Feet change shape and volume throughout the day, and a shoe that feels perfect at 9am can feel tight and restrictive by 3pm. Always fit to your larger foot, not the smaller one, because most people have a slight size difference between left and right.
Before you head to the shop, trace the outline of your foot on a piece of paper while standing. Place the shoe on top of that outline. If the shoe is narrower than your tracing at any point, it will cause pressure and discomfort in wear. This simple paper test takes thirty seconds and saves a great deal of pain.
What to bring with you when testing shoes:
- The socks you intend to wear with that type of shoe
- Any custom orthotics or insoles you use regularly
- A tracing of both feet on paper
- A note of your foot measurements (length and width)
Wearing your intended socks and orthotics during the fitting is non-negotiable. Testing a shoe barefoot when you plan to wear it with thick walking socks will give you completely misleading results. The fit changes significantly, and you may end up with a shoe that is too tight in real-world use.
| Preparation step | Why it matters |
|---|---|
| Test in late afternoon | Feet are at maximum size |
| Fit to larger foot | Avoids pressure on bigger side |
| Bring intended socks | Replicates real wearing conditions |
| Trace foot outline | Reveals width mismatches instantly |
| Bring orthotics | Ensures insole space is adequate |
Pro Tip: Use our footwear fit checklist before every shoe purchase. It takes under five minutes and dramatically reduces the chance of buying a shoe that causes problems later.
Step-by-step practical comfort tests
Once you’ve got everything ready, here’s how to run the comfort tests step by step. These are not vague suggestions. Each one targets a specific aspect of fit that directly affects your foot health.
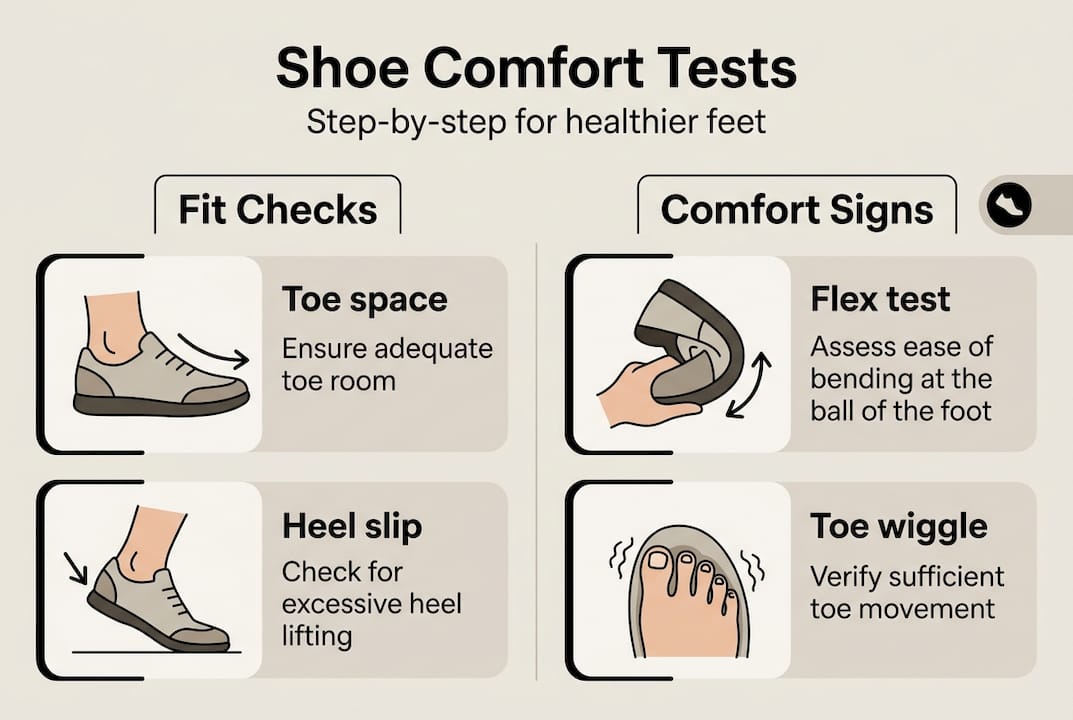
1. The thumb-width toe test Press your thumb sideways between the tip of your longest toe and the end of the shoe. You should feel a gap of roughly 1 to 1.5 cm. Too little space and your toes will jam forward when walking downhill or during any brisk movement. Too much space and your foot slides, causing blisters.
2. The heel slippage check Walk briskly in the shoe. Your heel should stay firmly seated. A small amount of movement is normal in brand-new shoes, but if your heel lifts more than a few millimetres with each step, the shoe is too long or the heel collar is too wide. Persistent heel slippage leads to blisters and poor gait mechanics.
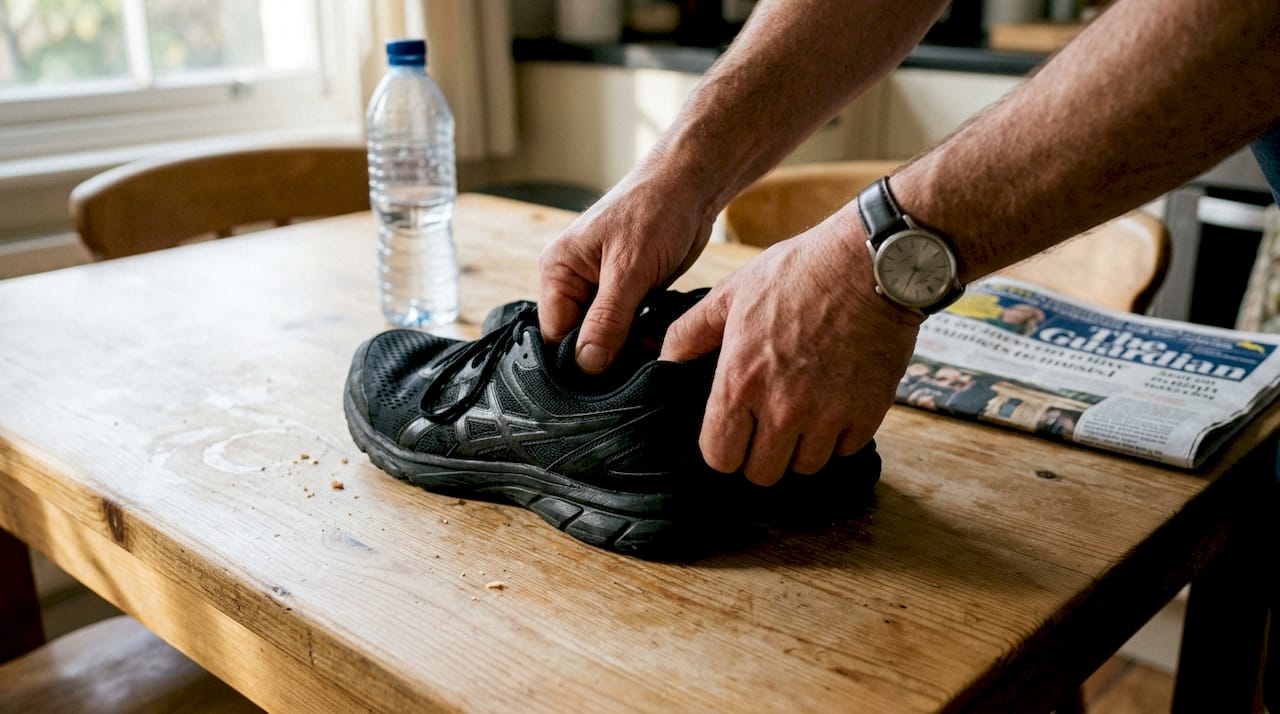
3. The flex test Hold the shoe at both ends and bend it gently. A well-constructed shoe should flex at the ball of the foot, which is where your foot naturally bends during walking. If it bends in the middle of the arch or resists flexing entirely, it will fight your natural movement pattern.
4. The toe wiggle and pinch check Sit down and wiggle all five toes. They should move freely without touching the sides or the top of the shoe. Run your fingers along the inside seams. Any ridge or rough patch that you can feel through the upper will become a hotspot during extended wear.
5. The walking and jogging test This is the most important test of all. Feet swell 5 to 8% during activity, so walk or jog in the shoe for at least five to ten minutes. Note any areas of heat, pressure, or rubbing. These sensations will only intensify over a full day’s wear.
| Test | What to look for | Red flag |
|---|---|---|
| Thumb-width toe space | 1 to 1.5 cm gap | Toes touching end |
| Heel slippage | Heel stays seated | Lifts more than a few mm |
| Flex test | Bends at ball of foot | Bends at arch or rigid |
| Toe wiggle | All toes move freely | Any pinching or pressure |
| Walking test | No hotspots after 5 to 10 min | Heat or rubbing present |
For more detail on running these assessments in a retail environment, our guide on how to check shoe comfort in-store covers the practicalities clearly. If you are newer to thinking about fit, the beginner’s guide to comfort is a useful starting point, and the shoe buying workflow ties all these steps into a single decision process.
Pro Tip: Always test both shoes, not just one. Foot asymmetry is common, and the fit that matters is the tighter of the two.
Stability, materials, and edge-case checks
After basic fit is confirmed, evaluate stability and material quality, and address any special requirements your feet may have. These checks are often overlooked but they matter enormously for long-term comfort and joint health.
Checking stability:
The heel counter is the stiff cup at the back of the shoe that holds your heel in alignment. Press firmly on it from the outside. It should be vertical and resist compression. A soft or collapsing heel counter offers little support and will allow your ankle to roll inward over time. Next, hold the shoe at each end and try to twist it. A stable shoe resists this torsional movement. Finally, confirm that the shoe bends only at the forefoot, not mid-arch.
Materials and closures:
For daily wear, breathable materials and secure closures are essential. Mesh or knit uppers allow air circulation and reduce moisture build-up, which is a leading cause of blisters and fungal issues. Laces, buckles, or adjustable straps allow you to customise the fit across the width of the foot. Avoid shoes with purely elasticated openings if you have any width variation in your feet. Understanding the importance of stability in footwear is worth exploring further if you are prone to ankle issues.
Edge-case checks for specific foot types:
- Wide feet need extra forefoot space, so check that the widest part of the shoe matches the widest part of your foot
- Bunions and hammertoes require a wide toe box and soft uppers that do not press against deformities
- Diabetic feet need extra depth and seamless interiors to eliminate any pressure points that could lead to ulceration
- High arches benefit from cushioned midsoles with moderate arch support
A shoe that feels uncomfortable from the moment you put it on will not improve with wear. Modern footwear is engineered to feel good immediately. If it doesn’t, move on.
For a deeper look at upper construction, our articles on breathable shoe materials and breathable shoes and comfort explain what to look for in practical terms.
Foot type, expert tests and injury prevention
With fit and stability checked, finalise your comfort evaluation using foot-type assessment and expert-informed injury risk guidance. This final layer of testing connects what you feel in the shop to what happens to your body over months of wear.
1. The wet test for arch type Wet the sole of your foot and step onto a piece of dark paper or card. The shape of the imprint reveals your arch type. A full imprint indicates a flat or low arch. A narrow band connecting heel and forefoot indicates a high arch. A moderate curve suggests a neutral arch. Assess your foot type first and use it as a starting filter, but never override genuine comfort in favour of a technical category.
2. Check your current shoe’s wear pattern The wear pattern on the sole of your existing shoes tells you whether you pronate (roll inward), supinate (roll outward), or strike neutrally. Heavy wear on the inner heel suggests overpronation. Wear on the outer edge suggests supination. Use this information to narrow your search, but treat it as a guide rather than a prescription.
3. Midsole compression check Press your thumb firmly into the midsole. It should compress slightly, roughly 30 to 40% of its depth, and spring back. A midsole that feels rock-hard offers no shock absorption. One that feels completely flat and doesn’t spring back has already lost its cushioning and should be replaced. Shoes typically need replacing after 300 to 500 miles of wear, regardless of how they look on the outside.
4. The comfort filter Research increasingly shows that comfort reduces injury risk by up to 67% compared to biomechanical matching alone. Trust what you feel. If a shoe ticks every technical box but feels slightly off, that feeling is data.
Pro Tip: Use our finding right shoes workflow to combine foot-type data with comfort testing into a single, efficient process. Also worth reading: why checking shoe interiors can reveal hidden pressure points before they become problems.
A fresh perspective: why subjective comfort beats technical specs
The footwear industry has spent decades convincing consumers that biomechanical matching is the gold standard for shoe selection. Gait analysis, pronation categories, motion control technology. It all sounds rigorous. But the evidence tells a more complicated story.
Studies show that comfort outperforms biomechanical matching for injury prevention. Motion control shoes, long recommended for overpronators, show no strong evidence of reducing injury rates compared to neutral shoes chosen on comfort alone. Softer midsoles, often marketed as superior cushioning, can in some cases increase joint stiffness or reduce proprioceptive feedback.
What this means practically is that your own personal comfort assessment is not a fallback when technical data is unavailable. It is the primary tool. The tests in this guide are not a simplified version of what experts do. They are what the evidence actually supports.
We believe the most honest thing we can tell you is this: if a shoe feels right from the first step, that sensation is meaningful, measurable, and predictive of long-term foot health. Trust it.
Try comfort-enhancing shoes and expert resources
Now that you know exactly how to test comfort, the next step is finding shoes that are built to pass every one of these checks from the outset.
At YDAUK, our problem feet shoe collection is designed with foot health at its core, featuring wide toe boxes, breathable uppers, and stable heel counters that meet the standards outlined in this guide. The YDA shoe technology page explains in detail how our footwear engineering aligns with evidence-based comfort principles. If you are looking for everyday options that combine style with genuine support, our range of comfortable trainers is a strong starting point for health-conscious buyers.
Frequently asked questions
How much toe space is ideal for comfort?
A thumb width or 1 to 1.5 cm between your longest toe and the shoe tip ensures optimal comfort and minimises rubbing during movement.
Why test shoes in the afternoon or evening?
Feet swell 5 to 8% daily, so testing shoes later in the day ensures a comfortable fit when your feet are at their largest and most representative of real-world conditions.
What’s the best way to check for stability in a shoe?
Press firmly on the heel counter, which should be vertical and resist compression; twist the shoe and expect resistance, and confirm it bends only at the ball of the foot.
Should I expect new shoes to break in or be comfortable from day one?
Reject any shoe that feels uncomfortable from the outset. Modern shoes shouldn’t require breaking in, and initial discomfort is a reliable predictor of ongoing problems.
How often should comfortable shoes be replaced?
Replace your shoes when the midsole feels flat or after approximately 300 to 500 miles of wear, even if the outer sole still looks intact.