
Double Your Sneakers' Lifespan: Sneaker Care Backed by YDA Checklists
Clean lightly and often, protect before the first wear, dry away from heat, and rotate at least two pairs. That single routine, more than any single product, is what separates sneakers that look new after a year from ones that fall apart in three months. Everything else in sneaker care is detail work built on top of it.
TL;DR:
- Regularly cleaning shoes immediately after wear with simple tools greatly extends their lifespan and prevents the need for harsh cleaning methods.
- Material-specific care is essential; leather should be cleaned with a damp cloth and conditioned regularly, while suede must be brushed dry to avoid stains.
- White midsole scuffs can be easily removed with a damp melamine eraser, but cracked or separated soles require professional repair.
- Protective sprays are most effective when applied before first wear and reapplied every few weeks, especially on light-colored leather and suede.
- Proper drying, storage, and rotation, including use of cedar shoe trees and breathable storage containers, are key to avoiding shape distortion, mold, and yellowing.
Table of Contents
- Sneaker care tips for the moment you get home
- Material-specific cleaning: leather, suede, canvas, and mesh
- How do you clean midsoles and outsoles without damaging the upper?
- When should you apply a protective spray?
- Drying and storage: how to avoid warping, mould, and yellowing
- How often should you clean and rotate your sneakers?
- Common sneaker care mistakes and quick fixes
- Expert tips and practical checklists from Panagiotis (YDA)
- What actually gets rid of sneaker odour?
- Preventative habits that add real years to a pair
- Author perspective: why the small routine beats the big clean-up
- Looking for sneakers that make care easier from day one?
- Sources
Sneaker care tips for the moment you get home
The best time to deal with dirt is before it dries and works into the material. A quick post-wear routine takes five minutes and prevents most of the damage that later needs aggressive cleaning to fix, which is exactly the kind of cleaning that shortens a sneaker’s life.
Do this every time, not just when shoes look obviously dirty:
- Knock off loose dirt and grit outdoors before it grinds into the upper.
- Pull out laces and insoles so both dry fully and don’t trap odour.
- Brush the whole shoe with a soft-bristled brush, working with the grain on suede.
- Wipe the midsole and spot-clean any fresh marks within 24 hours, before they set.
- Air the shoes out, then slot in shoe trees or stuff them with acid-free tissue straight away.
Keep a small kit by the door: a soft brush, a suede brush, a microfibre cloth, and a mild sneaker cleaner. That’s genuinely all most pairs need on a daily basis.
Material-specific cleaning: leather, suede, canvas, and mesh
Before you touch a bottle of anything, check the hang tag or the product page. Identifying the actual material determines which method is safe, and guessing wrong is how people ruin good shoes with a method meant for something else entirely.
- Leather. Wipe with a damp cloth, then use a mild sneaker cleaner or saddle soap sparingly, working in small circles rather than scrubbing. Condition regularly to stop the leather drying out and cracking, especially in creases across the toe box. Full instructions for keeping white leather shoes clean apply just as well to coloured leather.
- Suede and nubuck. Dry brush first, in one direction, to lift surface dirt. A suede eraser handles scuffs and grease marks. Water is the enemy here; it usually leaves permanent staining and stiffens the nap. For a genuinely stubborn mark, a small amount of white vinegar on a cloth, applied sparingly, is the exception worth trying before anything wetter.
- Canvas and textile. Spot-clean with a mild soap and cold water on a soft cloth, working the stain from the outside in so it doesn’t spread. Only put canvas sneakers in a washing machine if the manufacturer explicitly says it’s fine. Plenty don’t, because the adhesives holding the sole to the upper weren’t built for a spin cycle.
- Mesh and knit. These are the most delicate uppers on this list. Use a soft brush in gentle circular motions with a pH-neutral cleaner, never anything abrasive. Aggressive scrubbing pulls at the knit structure and leaves permanent snags or thinning patches.
Whatever the material, never run leather or suede through a washing machine. Machine washing can warp the shape, shrink the upper, and loosen the glue bonds that hold the whole shoe together.
How do you clean midsoles and outsoles without damaging the upper?
White midsoles pick up scuffs faster than almost anything else on the shoe, but they’re also the easiest part to restore.
- A melamine (magic) eraser, used damp, lifts scuffs from rubber and foam midsoles fast. Keep it strictly off the fabric or leather upper, since the same abrasion that removes a scuff will also strip colour and texture from softer materials.
- For yellowed rubber, a paste of baking soda and 3% hydrogen peroxide worked in gently and left for 20 to 30 minutes before rinsing tends to lift discolouration that’s built up over months of UV exposure.
- An old toothbrush gets into the outsole grooves where grit and small stones collect; rinse it clean rather than soaking the whole shoe.
Pro Tip: Test the peroxide paste on a small, hidden patch of midsole first. Some foam formulations react differently to peroxide, and you want to find that out on an inch of rubber, not the whole shoe.
If a sole has separated from the upper or the rubber has cracked through, that’s beyond a cleaning fix. At that point you’re looking at professional resoling rather than another round of home treatment.
When should you apply a protective spray?
Repellent sprays work best as prevention, not damage control. Applied before a stain sets, they slow moisture and dirt penetration significantly; applied after, they do very little.
- Apply a water and stain repellent before the first wear, while the material is clean and untreated.
- Reapply every few weeks for sneakers in regular rotation, since UV exposure and washing wear the coating down.
- Hold the can 6 to 8 inches from the shoe and use two light, even coats rather than one heavy one.
- Let the shoes dry fully, ideally overnight, before wearing them.
- Repellents work best on suede and light-coloured leather, where staining shows fastest and does the most visible damage.
Test any new spray on a hidden patch first, since some formulas alter the finish on certain leathers. And don’t mistake protection for waterproofing: a repellent sprayed sneaker will still soak through in heavy rain. It buys you time to wipe a spill off before it sets, not immunity from water.
Drying and storage: how to avoid warping, mould, and yellowing
Heat is the fastest way to ruin a sneaker you’ve just cleaned. Air-dry at room temperature, away from radiators, tumble dryers, and direct sunlight, which all warp adhesives or fade colour.
- Insert cedar shoe trees while drying and during storage; cedar holds shape and draws out residual moisture at the same time.
- Drop silica gel packets into shoes stored in humid climates or damp cupboards.
- Choose clear, drop-front boxes or breathable fabric shoe bags over sealed plastic, which traps moisture and encourages mould.
- Skip cardboard boxes in damp locations, since cardboard absorbs moisture rather than resisting it.
- Never stack pairs directly on top of each other unless they’re in a rigid box built for it, since the weight compresses the midsole underneath.
How often should you clean and rotate your sneakers?
A calendar makes this simple rather than reactive.
- Spot-clean any stain within 24 hours, before it sets into the material.
- Give sneakers worn three or more days a week a light clean roughly every two weeks.
- For occasional wear, once a month is usually enough to stay ahead of grime.
- Rotate between at least two pairs so each one gets 24 to 48 hours to decompress between wears, which lets the midsole foam recover its bounce and any moisture inside fully evaporate.
- Inspect regularly for midsole compression, sole delamination, or deep cracking in the rubber. These are structural failures that cleaning can’t fix, and they usually mean repair or retirement.
Common sneaker care mistakes and quick fixes
A few habits do irreversible damage, and they’re depressingly common.
- Never machine wash leather or suede uppers; the drum and detergent strip finish and warp shape.
- Never use bleach on coloured canvas. It’s fine on plain white canvas but strips colour from anything dyed.
- Avoid hot-air drying and long soaking, both of which weaken adhesive bonds over time.
- Don’t store dirty sneakers. Dirt left to sit degrades materials faster than active wear does, which is one reason gentle, frequent cleaning outperforms rare, intensive cleaning for long-term condition.
- Salt stains lift with a vinegar and water solution; oil needs cornstarch left to absorb before brushing off; ink usually needs a specialist leather or suede cleaner rather than a household solvent.
- If glue has separated at the sole edge, that’s a repair job, not a home-cleaning one.
Expert tips and practical checklists from Panagiotis (YDA)
[Panagiotis’s professional credentials and experience related to footwear technology and care]
Foam midsoles, EVA, and PU each respond differently to moisture and pressure, which changes how you should prioritise cleaning. Advanced midsole foams lose rebound faster when kept compressed and wet, so drying speed matters as much as cleaning method for anyone putting real mileage on a pair.
After a long run, check the outsole for embedded grit before it works into the tread, wipe the midsole while it’s still slightly warm and pliable, and never bag a pair while the insole is still damp. That last habit alone is behind most of the odour problems athletes complain about.
What actually gets rid of sneaker odour?
Smell comes from bacteria feeding on sweat trapped in the insole and lining, not from the shoe itself. Fix the moisture problem and the smell usually follows.
Pull the insoles out after every wear rather than leaving them in the shoe overnight. Letting them air separately cuts drying time roughly in half compared with drying inside a closed shoe. A light dusting of baking soda inside the shoe helps absorb moisture and neutralise odors; tip it out and brush the interior clean regularly.
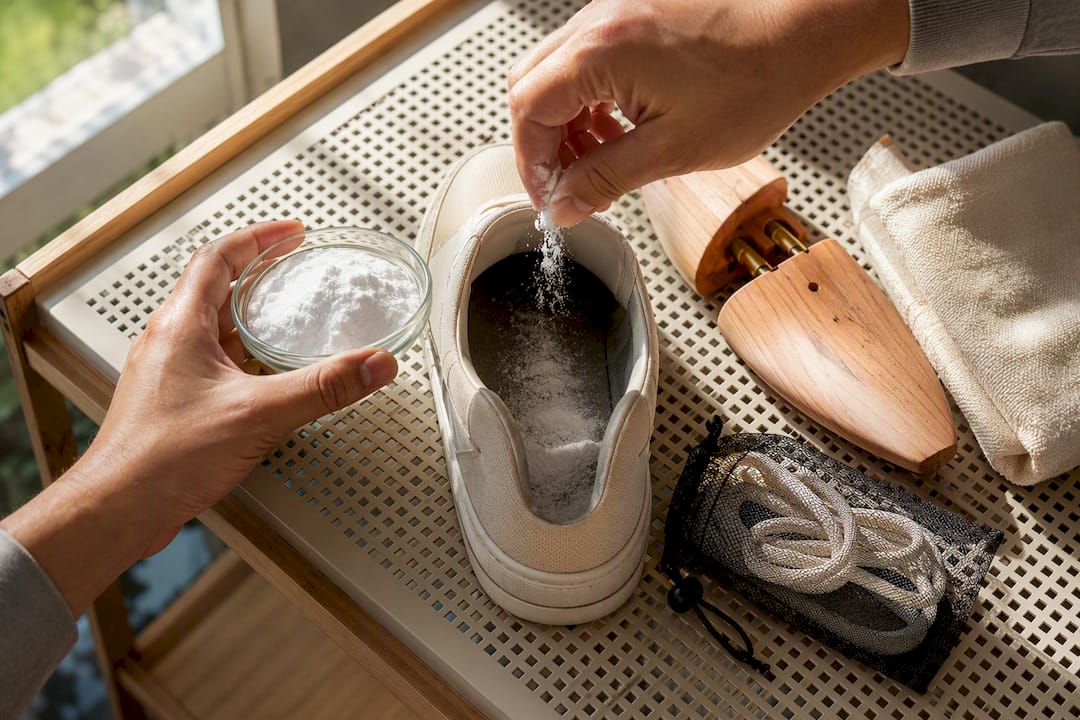
Cedar shoe trees do double duty here. Beyond holding shape, cedar naturally resists the bacteria that cause odour and helps draw moisture out of the lining between wears, which is part of why rotation and cedar trees show up together so often in sneaker care advice.
For a deeper problem, a diluted vinegar and water spray misted lightly into the shoe (never soaked) kills a good portion of the bacteria causing the smell, though it needs a full day to dry before wearing again. Specialist odour sprays built for footwear work faster if you need a same-day fix, but check they’re suitable for the specific upper material first, particularly with suede.
Washing laces separately, either by hand or in a mesh bag if machine-safe, matters more than people think. Laces sit directly against the tongue and absorb sweat all day, and a clean shoe with grubby laces still smells and looks unfinished.
Preventative habits that add real years to a pair
Most sneaker damage isn’t one dramatic event. It’s small neglect repeated for months.
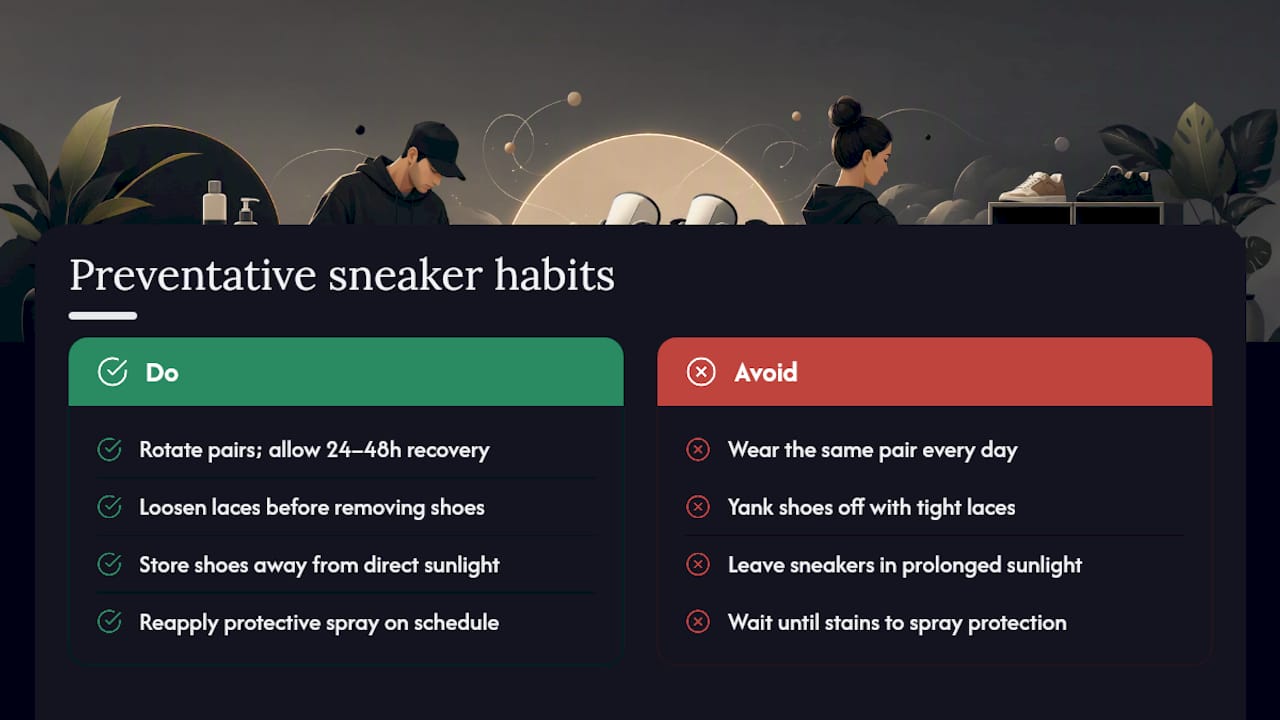
Rotating sneakers is the single biggest lever most owners ignore. Wearing the same pair every day means the same crease points flex thousands of times without recovery, and the same midsole compresses without the 24 to 48 hours it needs to spring back. Two pairs in rotation roughly doubles the usable life of each.
Lacing technique matters more than it sounds. Loosening laces fully before removing shoes, rather than yanking them off with laces still tight, protects the eyelets and prevents the heel counter from breaking down early.
Keep sneakers away from prolonged direct sunlight, even in storage. UV exposure yellows white soles and fades colour on uppers faster than almost any other factor, which is why sneakers left on a windowsill degrade visibly within weeks.
Reapply protective spray on schedule rather than only when a shoe already looks stained; by the time a mark appears, the spray’s main benefit has already passed. And check laces and insoles for wear the same way you check the upper. Replacing a $6 lace is far cheaper than the eyelet damage caused by a fraying one pulling unevenly.
Author perspective: why the small routine beats the big clean-up
The five to ten minutes after you take your shoes off matter more than any deep clean you’ll ever do. Build that habit and most damage never happens in the first place. Before trying anything aggressive, always check the manufacturer’s own care label. It should outrank generic advice, including this guide.
**
Looking for sneakers that make care easier from day one?
Some materials simply demand less maintenance to stay in good condition, which can help make the day-to-day upkeep described above less demanding. It’s not a shortcut around cleaning and drying properly. It’s a head start.

If you’re weighing up a footwear investment rather than another round of suede erasers and midsole paste, it’s worth understanding what’s actually built into the shoe before you buy. Read Technology of YDA Shoes for the detail on how YDA approaches comfort, support, and long-term wear, and see whether your next pair should be one that’s easier to keep looking right for longer.
Sources
- The complete sneaker care guide: cleaning, storage, and longevity | Spanish Clout
- Sneaker Care 101: How to Make Them Last Longer – UrbanMenStyle
- How To Clean Shoes | Cleaning Sneakers & Boots - Clarks
- Shoe Care Basics: How to Clean and Store Everyday Shoes - Save & Care