
How to prevent sports injuries: a practical guide
The single most effective way to prevent sports injuries is to build prevention into every session rather than treating it as a separate task: dynamic warm-ups, progressive load increases, targeted strength work, right footwear, and proper recovery. That combination is backed by systematic review evidence linking neuromuscular warm-ups and eccentric strengthening to measurably fewer lower-limb injuries.
Do these five things in your next session:
- Spend several minutes on a dynamic warm-up, never static stretches, before you start.
- Cap any weekly training increase at a modest and gradual percentage.
- Add two short strength sessions a week, including eccentric hamstring work.
- Check your shoes for wear and match them to your sport.
- Prioritise sleep and hydration in the 24 hours either side of hard sessions.
Panagiotis, who covers footwear technology and injury prevention for Ydauk, built this guide around clinical guidance from the Mayo Clinic and orthopaedic best practice, translated into steps you can actually use this week.
Key Takeaways
Preventing sports injuries comes down to combining dynamic warm-ups, progressive load management, strength and eccentric training, proper footwear, and adequate recovery in every training week.
| Point | Details |
|---|---|
| Warm up dynamically | Spend 8 to 10 minutes on movement-based drills before training; save static stretches for after. |
| Follow the 10% rule | Increase weekly volume or intensity by no more than 10% at a time to avoid overuse injury. |
| Train eccentrically | Add Nordic curls and single-leg eccentric work twice weekly to protect hamstrings and tendons. |
| Watch for early warning signs | Log daily soreness and treat pain that shifts from after training to during training as a signal to reduce load. |
| Check footwear regularly | Replace running shoes regularly based on use, and consider Ydauk’s technology-driven designs for better load distribution. |
Table of Contents
- A practical prevention checklist you can follow this week
- Progressive load management: plan increases and avoid overuse
- Warm-up, cool-down and movement preparation templates
- Strength and conditioning to protect joints and tendons
- Footwear and kit: selecting, caring for and replacing shoes
- Hydration, nutrition and recovery practices that support tissue repair
- When to see a clinician and safe return-to-play principles
- Why neuromuscular training and proprioception exercises matter
- Mental focus and psychological readiness to prevent injuries
- Catching injuries early before they get worse
- A footwear-first view on embedding prevention
- How Ydauk’s footwear technology fits your prevention plan
- Sources
A practical prevention checklist you can follow this week
Most sports injuries do not happen because someone was unlucky. They happen because training load jumped too fast, warm-ups got skipped, or gear was wrong for the job. The Johns Hopkins Medicine guidance on sports injuries lists poor training practices, inadequate warm-up, incorrect equipment, and weak baseline conditioning as the leading causes. Fix those four things and you remove most of the risk.
Here’s a checklist that covers a full training week, not just a single session:
- Warm up dynamically for several minutes before every session. Leg swings, walking lunges, high knees, and short strides get blood into the muscles you’re about to load.
- Apply the 10% rule to weekly volume. If you ran 20 miles last week, don’t jump past 22 this week. The same logic applies to minutes on court, reps in the gym, or laps in the pool.
- Rotate between two pairs of shoes if you train more than three times a week. Alternating cushioning and drop patterns spreads load across slightly different muscle groups.
- Cross-train twice weekly. Swap one running session for cycling or swimming to rest impact-loaded joints while keeping cardiovascular fitness up.
- Check technique on your highest-risk movements monthly. A coach, a training partner, or even a phone video can catch a knee collapsing inward on a squat or a poor landing pattern before it becomes a habit.
- Hydrate before you’re thirsty. Aim for pale yellow urine as a rough marker, and top up fluids for any session over 45 minutes.
- Protect 7 to 9 hours of sleep, especially the night after a hard session. Tissue repair happens overnight, not during the workout itself.
- Inspect footwear every fortnight for tread wear, sole compression, and upper stretching. A compressed midsole stops absorbing shock long before it looks obviously worn out.
- Static stretch only after training, holding each stretch for a moderate duration. The NHS guidance on post-exercise stretching is clear that static holds belong at the end of a session, not the start.
- Log soreness on a simple 1 to 10 scale each morning. A pattern of rising numbers over three or four days is your cue to back off before, not after, something tears.
Pro Tip: Pair your warm-up with an existing habit rather than relying on willpower. Do your dynamic drills the moment your kit bag hits the floor, or set them as the first item in your training app’s session template. Habits stick better when they’re attached to a cue you already have, not a decision you have to make fresh every time.
None of this needs to take longer than your current routine. It just needs to happen in the right order, every time.
Progressive load management: plan increases and avoid overuse
Progressive load management means increasing training volume or intensity in small, controlled steps so tissue has time to adapt. Skip that gradual build and you get the overuse injuries that fill physiotherapy clinics: stress fractures, tendinopathy, and chronic strains. Mayo Clinic’s sports medicine guidance frames this as building capacity gradually rather than testing limits repeatedly.
A workable planning approach covers both volume and intensity across a short block:
- Weeks 1 to 2: establish a baseline you can repeat comfortably three times without unusual soreness.
- Weeks 3 to 4: increase either volume or intensity by up to 10%, never both at once.
- Week 5: hold steady or drop back 20% as a deliberate recovery week.
- Week 6: resume increases from the new baseline.
Track two numbers each week: total volume (minutes, miles, or reps) and perceived intensity (a simple 1 to 10 effort scale works fine). Increasing one while holding the other flat lets tissue catch up.
Normal muscle soreness peaks around 24 to 48 hours after a new stimulus and fades on its own. Pain that sharpens during activity, lingers past four or five days, or shows up on one side only is different. That’s a signal to cut volume by a third for a week, not to push through it.
Warm-up, cool-down and movement preparation templates
Dynamic warm-ups raise muscle temperature, activate the nervous system, and rehearse the movement patterns you’re about to use. Harvard Health’s injury prevention guidelines recommend 5 to 10 minutes of this before any session, moving from general activation into movement-specific drills.
A repeatable 8 to 12 minute warm-up sequence:
- Two minutes of light jogging or cycling to raise core temperature.
- Leg swings, arm circles, and hip openers for general mobility (two minutes).
- Walking lunges, high knees, and butt kicks to activate major muscle groups (three minutes).
- Sport-specific drills: short sprints for runners, quick footwork patterns for football, shadow swings for racket sports (three to five minutes).
Cool down for 5 to 10 minutes with light aerobic movement followed by static stretching, holding each major muscle group for 15 to 30 seconds.
Pro Tip: Match your final warm-up drills to what you’re about to do. Runners finish with strides, footballers finish with cutting and deceleration drills, and tennis or squash players finish with shadow strokes at match pace. The last two minutes of a warm-up should look like a smaller version of the sport itself.
Strength and conditioning to protect joints and tendons
Strength training, particularly eccentric work, is one of the most consistently supported levers for reducing injury risk. Research on neuromuscular training and eccentric strengthening shows programmes like FIFA 11+ reduce lower-limb injuries while also improving sprint and jump performance, which makes this one of the few prevention habits with a genuine performance upside attached.
Eccentric hamstring work deserves particular attention because hamstring strains are so common and so slow to heal. Nordic curls and slow-eccentric single-leg deadlifts train the muscle to absorb force while lengthening, which is exactly what happens during sprinting.
Build a simple weekly structure:
- Two to three strength sessions weekly, with at least 48 hours between sessions targeting the same muscle groups.
- Start with bodyweight or light-load versions and add resistance every one to two weeks once form is solid.
- Core exercises: bodyweight squats progressing to goblet squats; Nordic curl negatives progressing to full Nordic curls; single-leg glute bridges progressing to single-leg deadlifts.
- Once a base is built, drop to one maintenance session weekly during competition periods rather than stopping altogether.
Teens can follow the same structure with lighter loads and closer technique supervision, since growth-related tissue changes make form checks more important, not less.
Footwear and kit: selecting, caring for and replacing shoes
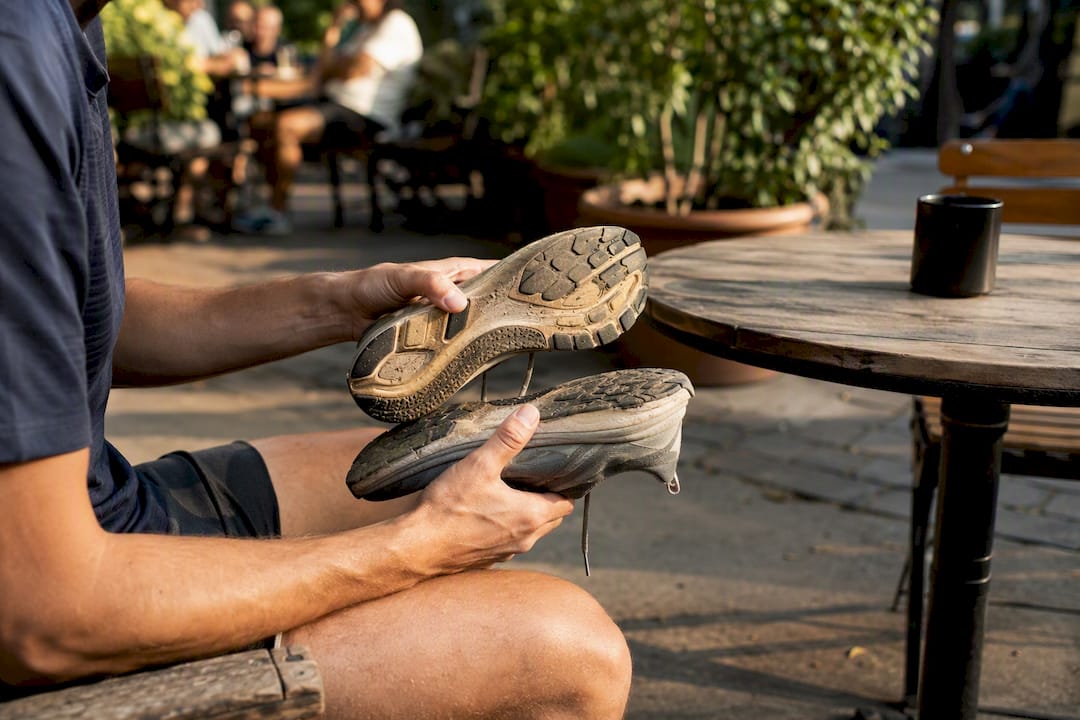
Footwear shapes how force travels through your feet, ankles, knees, and hips with every stride. The wrong shoe for your sport, or a worn-out version of the right one, changes that load path and pushes stress onto joints and tendons that weren’t built to absorb it. Johns Hopkins Medicine’s injury prevention guidance names incorrect gear as one of the four leading causes of sports injuries, right alongside poor training practices.
A shoe that has lost its midsole cushioning can look almost new on the outside while offering a fraction of its original shock absorption underneath. That mismatch between appearance and function is why so many people keep running in shoes that stopped protecting them months ago.
Getting fit properly matters more than most people assume. A shoe should have a thumb’s width of space at the toe, hold the heel without slipping, and match your foot’s actual shape rather than a generic average. Ydauk’s guide to choosing supportive shoes covers the fitting process in more depth, and the athletic shoe selection checklist is a fast reference if you’re buying for a specific sport.
Quick maintenance checklist:
- Press the midsole with a thumb. If it doesn’t spring back, cushioning is gone.
- Check tread wear patterns for uneven compression on one side.
- Look at the upper for stretching or splitting near the toe box.
- Replace running shoes regularly based on use, sooner for high-mileage weeks.
Pro Tip: Keep two pairs in rotation and log the date you started wearing each one. Most people forget how old a shoe actually is, which is exactly how worn-out cushioning goes unnoticed.
For the full signs a shoe has reached the end of its life, Ydauk’s piece on why replacing shoes regularly matters for foot health walks through it, and the footwear care guide covers cleaning and storage that extend a shoe’s usable life.
Hydration, nutrition and recovery practices that support tissue repair
Fluid needs scale with session length and intensity, not with a fixed daily number. For sessions under 45 minutes, water is usually enough. Past an hour, especially in heat, add electrolytes to replace what sweat takes with it.
Recovery evidence is genuinely mixed for some popular modalities, but the basics hold up consistently:
- Drink to pale yellow urine as a rough hydration marker, topping up before, during, and after longer sessions.
- Eat protein within a couple of hours of hard training to support muscle repair, alongside carbohydrates to refill glycogen stores.
- Protect 7 to 9 hours of sleep, since tissue repair research consistently flags sleep as one of the few recovery factors with strong support behind it.
- Schedule at least one full rest or active recovery day weekly, using light movement like walking or easy cycling rather than complete inactivity.
Recovery does not need to be complicated to work. It needs to happen consistently.
When to see a clinician and safe return-to-play principles
Some symptoms need a professional opinion, not a wait-and-see approach. Get assessed promptly if you notice a joint giving way or feeling unstable, swelling that appears within hours of an injury, sharp pain that stops you bearing weight, numbness or tingling, or pain that hasn’t eased after a week of rest.
A physiotherapist or sports medicine doctor is usually the right first call. Expect a movement assessment, questions about training history, and possibly imaging if something structural is suspected.
Returning to sport after injury should follow stages, not a single “back to normal” jump:
- Pain-free range of motion and basic strength restored first.
- Sport-specific drills at reduced intensity, checking for pain or compensation patterns.
- Full-intensity training in a controlled setting before competitive return.
- Functional testing, such as single-leg hop tests, comparing the injured side against the uninjured one.
Rushing this sequence is one of the most common reasons injuries recur within the same season.
Why neuromuscular training and proprioception exercises matter
Proprioception is your body’s sense of where a joint sits in space without looking at it, and it degrades fast after even a minor sprain. That’s a big part of why ankle sprains recur so often: the injury itself damages the nerve receptors that feed that positional sense, leaving the joint less able to react to an uneven surface next time.
Neuromuscular training rebuilds that feedback loop. Programmes like FIFA 11+ combine balance work, controlled landings, and change-of-direction drills specifically because the evidence behind them shows reduced lower-limb injury rates alongside better sprint and jump output. This isn’t a niche add-on for elite athletes. It’s a core reason amateur and youth programmes that adopt structured warm-ups see fewer ACL tears and ankle sprains.
Simple proprioception work fits into any warm-up: single-leg balance holds for 30 seconds per side, single-leg balance with eyes closed once the basic version feels easy, and small hops onto and off a low step focusing on a soft, controlled landing. None of this needs equipment, and all of it takes under five minutes.

The payoff compounds over a season. An ankle or knee that reacts correctly to an unexpected twist, a divot in the pitch, or a stumble on a kerb during a run is the difference between a stumble and a three-month lay-off. That reactive capacity is trainable, and it fades without regular reinforcement, which is why proprioception drills belong in a warm-up every week, not just after a previous injury.
Mental focus and psychological readiness to prevent injuries
Fatigue is not only physical. A tired, distracted, or anxious athlete makes worse decisions in exactly the moments that demand good ones: a mistimed tackle, a late reaction to an opponent, a landing that’s slightly off because attention drifted for half a second.
Sports medicine practitioners increasingly treat focus and stress as injury risk factors in their own right, not just performance variables. Athletes returning from a previous injury often show measurably slower reaction times and more hesitant movement patterns when they’re anxious about reinjury, which itself raises the odds of a fresh one. That’s part of why staged return-to-play frameworks build in confidence, not just physical readiness, before clearing someone for full contact or competition.
Practical steps that support focus without needing a sports psychologist:
- Build a short pre-session routine that signals “training starts now,” helping shift attention away from work or school stress.
- Recognise when persistent life stress or poor sleep is affecting concentration, and scale training intensity down on those days rather than pushing through on autopilot.
- After a previous injury, don’t rush back to full-intensity, unpredictable situations like scrimmages or matches before confidence has caught up with physical healing.
Treating focus as part of injury prevention, rather than a separate wellbeing topic, closes a gap that a purely physical checklist misses.
Catching injuries early before they get worse
Most serious sports injuries announce themselves quietly first. The gap between a manageable niggle and a torn tendon is usually a week or two of ignored warning signs, not a single dramatic moment.
Watch for these early markers:
- Pain that changes character. A dull ache that turns sharp, or pain that shifts from “after training” to “during training,” both signal worsening tissue stress.
- Asymmetry. One side feeling tighter, weaker, or more painful than the other over several sessions, rather than one bad day.
- Reduced range of motion. Struggling to reach a stretch or squat depth you managed easily last week.
- Swelling that doesn’t fully resolve overnight. Ongoing puffiness around a joint, even mild, points to unresolved inflammation.
- Compensation patterns. Favouring one leg, shortening your stride, or altering technique to avoid discomfort.
Tendinopathy is a good example of why early catching matters. Early-stage tendon pain often only appears after activity and eases with rest, tempting people to train through it. Left unaddressed, that same tendon can thicken, weaken, and eventually tear under load that used to feel routine. The same logic applies to stress fractures, which frequently start as vague, activity-related bone pain that’s easy to dismiss as muscle soreness until an X-ray shows a hairline crack.
The fix isn’t complicated: log symptoms daily, take any asymmetry seriously after three or four days, and drop training load the moment pain shifts from “after” to “during.” Catching a problem at the tendinopathy stage might cost you a week of modified training. Catching it after a tear can cost a season.
A footwear-first view on embedding prevention
Prevention only works when it’s built into the session, not bolted on afterwards, and footwear is the one variable athletes underestimate most consistently. Check your shoes with the same discipline you check your warm-up, and consult Ydauk’s technology resources when you’re ready to upgrade.
How Ydauk’s footwear technology fits your prevention plan
A prevention plan built on warm-ups, progressive load, and strength work still needs the right shoe underneath it, because none of that other work compensates for a midsole that’s stopped absorbing shock. Ydauk designs footwear around load distribution and foot health specifically, rather than treating comfort as an afterthought bolted onto a standard trainer.

The Technology of YDA Shoes page explains how that engineering supports even weight distribution and energy return through a stride, which matters most for anyone managing existing foot conditions, diabetes-related foot sensitivity, or recovering from a previous lower-limb injury. Pair that with the shoe-fitting checklist above and the maintenance routine covered earlier in this guide, and footwear stops being a gap in your prevention plan. If your current shoes are past their prime or you’re building a rotation for the season ahead, browse the range on the Technology page and check which model matches your sport and foot profile before your next session.
Sources
- Stay in the Game: Comprehensive Approaches to Decrease the Risk of Sports Injuries
- Mayo Clinic Q&A: Sports injury prevention strategies that boost performance
- Injury prevention guidelines - Harvard Health
- Preventing Sports Injuries - Johns Hopkins Medicine
- How to stretch after exercising - NHS
This article is general information, not a substitute for advice from a qualified doctor. Consult a qualified healthcare professional about your own circumstances before acting on anything here.