
Measure your foot correctly for a shoe size that actually fits
Measure heel to longest toe and the widest part of your forefoot while standing, in the evening, wearing the socks you’ll actually wear with the shoes. Use whichever foot measures larger. That single number, converted from centimetres against a proper size chart, does more to fix bad shoe fit than anything else you can do at home.
The two measurements that matter:
- Length: heel to the tip of your longest toe, in millimetres or centimetres
- Width: the widest point across your forefoot, usually just behind the toes
Get these right and everything else follows. Get them wrong and no amount of clever shopping saves you.
For the conditions to matter this much: feet swell through the day, so a morning measurement can undersell you by a noticeable amount by evening. Stand with full weight on the foot rather than sitting, because sitting lets the arch lift and the foot narrow slightly. Measuring in the late afternoon or evening, standing with full weight, wearing your usual socks is the standard podiatry advice, and it’s the one habit that fixes more fit complaints than any other single change. Once you have both feet measured, round the centimetre figure up rather than down when you’re between sizes, and check it against the shoe’s specific size chart rather than assuming every brand’s “9” means the same thing.
Key Takeaways
Reliable shoe fit comes from measuring both feet standing in the evening, recording length, width, and arch length, and converting the larger foot’s centimetre figure against a brand-specific size chart.
| Point | Details |
|---|---|
| Measure standing, in the evening | Feet swell through the day, so an evening, full-weight measurement reflects your true size. |
| Capture length and width | Heel-to-longest-toe and forefoot width both need recording; width is the dimension people skip. |
| Use the larger foot | Most people have a size difference between feet; always buy for the bigger one. |
| Check arch length too | If arch length exceeds toe length, size on arch length to avoid a pinched forefoot. |
| Record and re-check yearly | Foot size shifts with weight change, pregnancy, and age; re-measure roughly once a year. |
Where these rules come from
- Podiatrist guide to measuring foot size
- Brannock device instructions and fitting tips
- Ydauk’s shoe conversion chart
Once you’ve got your measurements recorded, Ydauk’s footwear is built around the technology behind Ydauk shoes, designed to support the exact length, width, and arch considerations this guide has walked through, so converting your centimetre figure into a size you can actually rely on takes one visit, not a guessing game.
Table of Contents
- How to measure my foot: three quick methods compared
- Step-by-step: the paper trace method for length and width
- What a Brannock device measures, and when it matters more than a tape measure
- Foot width and what the letters B, D, E, and EE actually mean
- When to measure, and ten rules that make the number reliable
- Turning centimetres into a shoe size that fits
- How to check fit beyond the tape measure
- Keeping a record of your measurements for next time
- Measuring children’s feet and special cases
- How foot shape and arch height change what “fits” actually means
- Editorial take: why most sizing advice stops one step too early
- Sources
How to measure my foot: three quick methods compared
You’ve got three realistic options, and none of them need special kit beyond what’s already in a kitchen drawer.
- Paper trace. Stand on a sheet of paper, trace round your foot, then measure the tracing. Gives you length and width in one go, and it’s the most forgiving method if your hand shakes slightly.
- Wall and ruler. Stand with your heel against a wall, place a book or flat object against your longest toe, then measure the gap from wall to book. Fast, but width needs a second step.
- Phone or LiDAR scan. Newer phones can generate a 3D scan of your foot using the camera or LiDAR sensor. Apps like this can be genuinely precise, but only when the reference object is placed correctly in frame, and most people don’t need this level of tech for an everyday shoe purchase.
If you’ve only got two minutes, the wall-and-ruler method gets you a usable length figure. If you want length and width together without downloading anything, the paper trace wins. Save the scan apps for when you’re chasing a specific fit problem, not a routine purchase.
Pro Tip: Do the paper trace on a hard floor, not carpet. Carpet lets the paper shift and the pen drag at an angle, which can throw your reading off by several millimetres without you noticing.
Step-by-step: the paper trace method for length and width
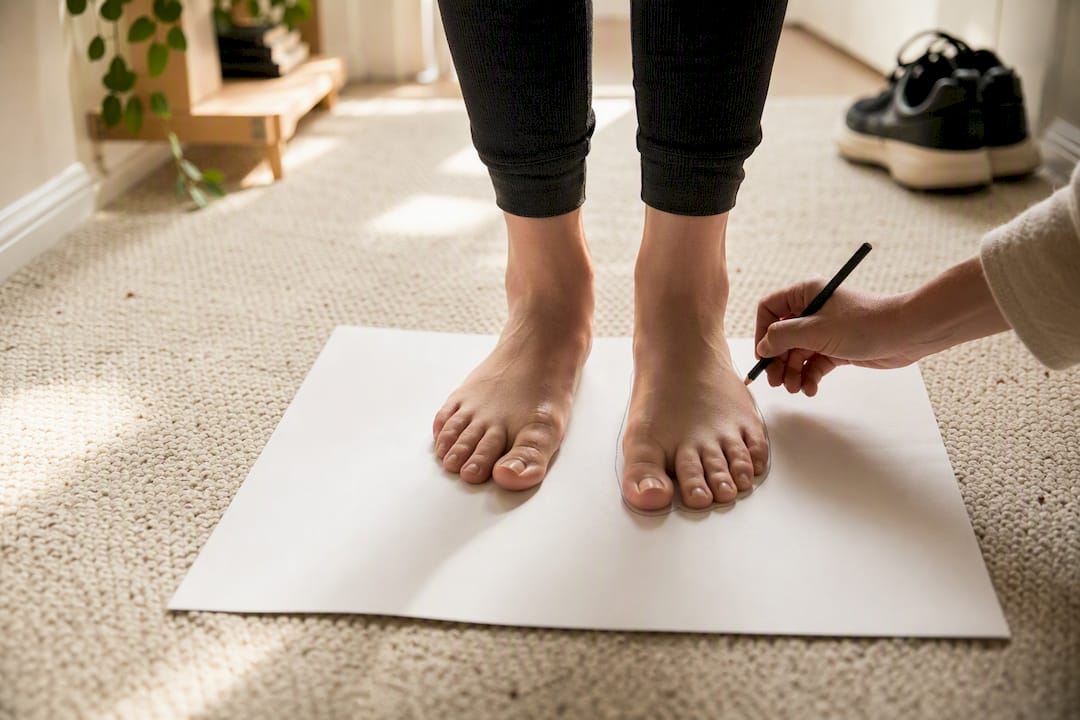
This is the method most podiatry guides default to, and it takes about five minutes per foot.
What you’ll need:
- A sheet of paper larger than your foot (A4 works for most adults)
- A pen or pencil held straight up and down, not at an angle
- A tape measure or ruler marked in millimetres
- Tape to stop the paper sliding
- The socks you’ll actually wear with the shoes
Steps:
- Tape the paper to a hard floor, ideally against a wall.
- Stand on the paper with your heel touching the wall and your weight evenly distributed.
- Hold the pen perpendicular to the paper and trace carefully around your foot, keeping the pen vertical the whole way round.
- Mark the tip of your longest toe and the two widest points across the forefoot.
- Measure from the wall to the toe mark for length, and across the widest points for width, recording both in centimetres.
Repeat the whole process on the other foot. Most people have a size difference between left and right, sometimes a noticeable one, so record both figures and use the larger for buying shoes.
What a Brannock device measures, and when it matters more than a tape measure
Shoe shops still use the Brannock device for a reason. It’s a flat metal ruler with sliding parts that captures three things a paper trace can’t manage at once: heel-to-toe length, heel-to-ball length (your arch), and width.
- Stand on the device with full weight, heel against the back cup.
- The heel-to-toe scale reads off your longest toe.
- A separate slider reads the arch length, from your heel to the ball of your foot.
- A width bar sits across the widest point of your foot for a width reading.
Here’s the part most people miss: if your arch length reading is bigger than your heel-to-toe reading, size based on the arch length, not the toe length. This matters most for people with long, narrow feet or high arches, because sizing off the shorter toe measurement compresses the ball of the foot inside a shoe that’s technically “long enough” by the tape measure. It’s a small distinction that explains a lot of otherwise mysterious discomfort.
Foot width and what the letters B, D, E, and EE actually mean
Width is the dimension people skip, and it’s usually the reason shoes that are “the right length” still feel wrong. Measure across the widest part of your forefoot, in millimetres, with the same standing, evening, socked-foot rules as your length measurement.
- Width letters run from narrow to wide, commonly labeled A/B (narrow), D (standard), E, EE, and EEE (wide to extra wide).
- The difference between each letter is roughly 6mm, though the exact jump varies by brand and by shoe last.
- Width interacts with length. A size 9 in a D width isn’t simply “9, but wider” than a size 9 in a B. The whole last shape changes.
Width is also the dimension most commonly measured badly, largely because people measure it standing on one leg or without weight on the foot, which narrows the reading. If your measured width sits at the top of a brand’s standard range, or beyond it, look specifically for wide or extra-wide options rather than buying a longer shoe, which won’t solve width issues… A longer shoe doesn’t fix a width problem. It just moves the discomfort from your toes to your heel.
When to measure, and ten rules that make the number reliable
Timing and technique matter as much as the tape measure itself.
- Measure in the late afternoon or evening, after your feet have swollen naturally through the day to get an accurate measurement.
- Stand with full body weight on the foot being measured.
- Wear the socks you intend to wear with the finished shoes.
- Measure both feet separately and use the larger of the two.
- Work on a hard, flat surface, never carpet.
- Keep the pen or pencil perpendicular to the paper at all times.
- Measure heel-to-toe length and heel-to-ball arch length separately if you can.
- Take width across the widest point of the forefoot, not the narrowest.
- Factor in orthotics or insoles you’ll wear inside the shoe.
- Re-measure if a result looks off rather than guessing and rounding.
This full ten-point checklist reflects standard podiatry and retail fitting guidance, and it’s worth revisiting once a year, or after pregnancy, significant weight change, or a new pair of orthotics, since foot dimensions genuinely shift over time.
Pro Tip: Measure again a few months after any big life change, weight loss, weight gain, or pregnancy. Feet don’t snap back to their old size on a schedule, and shoes bought on outdated measurements are a common source of “these felt fine in the shop” complaints.
Turning centimetres into a shoe size that fits
Centimetres are the one number that works across every sizing system, which is exactly why they’re worth writing down before you even look at a size chart. Many sizing tools and retailers now accept a straight centimetre input and convert it against their own last shape, rather than forcing you to guess a UK or US number directly.
- Take your larger foot’s length in centimetres and check it against a proper conversion chart, since UK, EU, and US sizing systems don’t move in lockstep with each other.
- If you fall between two sizes, go up rather than down. A slightly loose shoe is fixable with a thicker sock or insole; a tight one isn’t.
- If length says one size and width says another, prioritise width, or look at a brand whose last is cut roomier through the forefoot.
- Mondopoint, the centimetre-based system, is the most consistent reference point if you’re comparing across brands, and it’s worth using the men’s foot size chart or a shoe size in cm guide to cross-check before you buy.
Fixing common measuring mistakes
- Tilted pen: re-trace with the pen held dead vertical; a slanted line adds or subtracts several millimetres.
- Sliding paper: tape all four corners down before you start.
- Measuring on carpet: move to a hard floor, always.
- Morning measurements: re-measure in the evening; the difference can be enough to change your size.
- Feet differing by more than half a size: buy for the larger foot and add a thin insole for the smaller one, or look at brands known for a roomier standard last.
- Anything beyond routine fit doubt: get measured in-store on a Brannock device, or see a podiatrist if you have diabetes or another condition affecting foot shape.
Why these rules come from established fitting practice
The measurement rules running through this guide, stand fully weighted, measure in the evening, use both feet’s larger result, wear your actual socks, come directly from established podiatry and retail fitting guidance, not shortcuts invented for convenience. Ydauk’s own foot size measurement guide and home sizing instructions apply the same principles specifically to the shoes Ydauk designs, so a measurement taken this way converts cleanly against Ydauk’s own charts.
How to check fit beyond the tape measure
A correct measurement gets you into the right size range. It doesn’t guarantee comfort, because feet aren’t rigid blocks and shoes aren’t measured the same way twice across every brand.
Try the shoe on both feet, standing, and walk around for several minutes rather than a few steps across a shop floor. Your gait shifts weight through the foot in ways that standing still never reveals, and a shoe that feels fine stationary can pinch or rub once you’re actually walking in it. Pay attention to three spots specifically: the width across the ball of the foot, whether your longest toe has roughly a thumb’s width of space at the front, and whether your heel lifts noticeably out of the back of the shoe as you step.
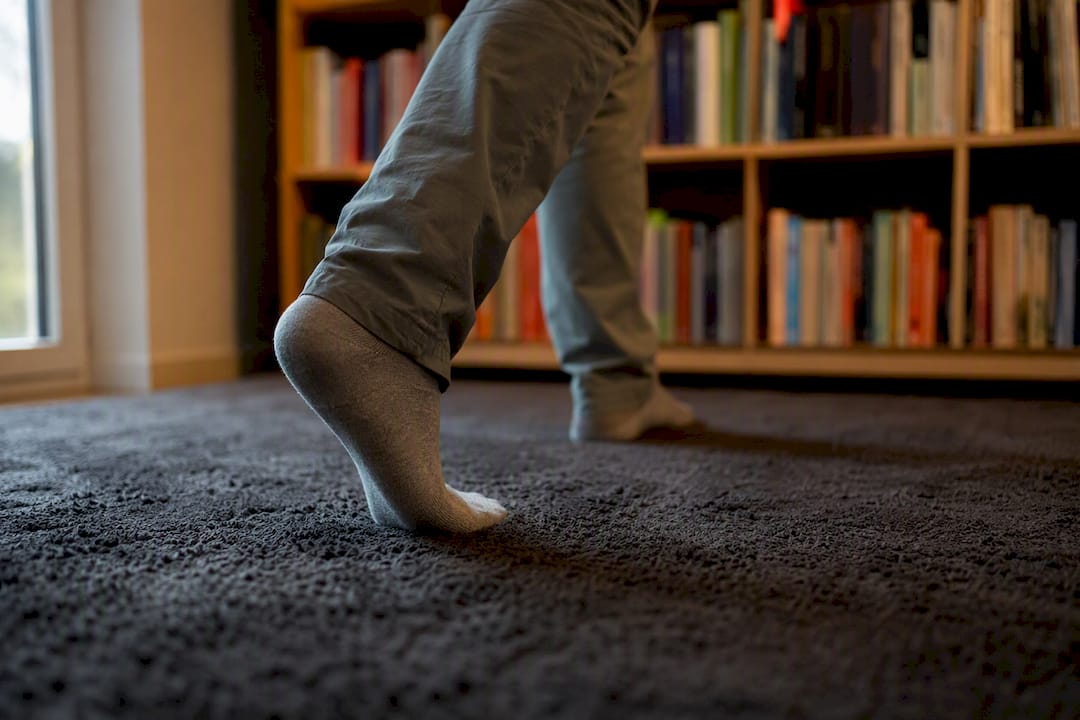
Watch how you walk, too. If you naturally roll onto the inside edge of your foot (overpronation) or the outside edge (supination), that affects which part of the shoe wears first and which width or arch support actually suits you. Some retailers offer a basic gait assessment on a treadmill or pressure mat, and it’s worth doing once if you’ve had recurring fit problems that measurements alone never seem to solve.
Give it time before deciding. Walk on carpet and on a hard floor if you can, since surfaces change how a shoe feels underfoot. If you’re between two sizes after trying both on, the general rule holds: go with the one that doesn’t compress your toes, even if the heel feels a touch roomy at first, because a heel that’s slightly loose is far easier to live with than a toe box that’s too tight.
Keeping a record of your measurements for next time
Feet change. Weight shifts, pregnancy happens, ageing loosens the ligaments in the arch, and orthotics alter the shape a shoe needs to accommodate. A single measurement taken today is useful for exactly as long as your feet stay the same, so it’s worth writing the numbers down properly rather than trusting memory.
Keep a simple note, on your phone or on paper, with four figures for each foot: heel-to-toe length, arch (heel-to-ball) length if you measured it, forefoot width, and the date you measured. Note which socks you wore, since a thick winter sock adds a small but real amount to a width reading compared with a thin summer one.
This record pays off the next time you shop, especially online, where you can’t try before you buy. Instead of guessing your size from memory or from what you wore last year, you can check a new brand’s chart against your actual centimetre figures and buy with real confidence. It’s also the fastest way to notice a genuine change, if this year’s measurement is half a centimetre longer than last year’s, that’s worth acting on rather than ignoring.
Measuring children’s feet and special cases
Children’s feet grow fast, often through more than one size in six months during growth spurts, which makes the paper trace method particularly useful since it takes two minutes and needs no special equipment. Measure children standing, not sitting, because a child’s arch and weight distribution shift more than an adult’s between the two positions. Leave a thumb’s width, not a finger’s width, of growing room at the toe, and check again every few months rather than assuming last season’s size still fits.
Wide or narrow feet need the same core method, standing, evening, both feet measured, but the outcome steers you toward a different width letter rather than a different process. If your measured width sits above E or EE on a standard chart, look specifically for shoes built on a wider last rather than simply buying longer.
Foot deformities, bunions, hammer toes, or significant asymmetry between the two feet deserve a bit more caution. A home measurement still gives you a useful starting figure, but it’s a first step rather than a substitute for professional assessment when there’s an underlying condition, particularly for anyone with diabetes, where an ill-fitting shoe carries a genuinely higher risk of causing pressure injuries that go unnoticed. If your measurements consistently produce shoes that hurt in the same spot regardless of size or width, that’s a signal to see a podiatrist rather than keep guessing at home.
How foot shape and arch height change what “fits” actually means
Two people with identical heel-to-toe length can need completely different shoes, because length is only one part of the shape a shoe has to accommodate. Arch height is the variable people underestimate most.
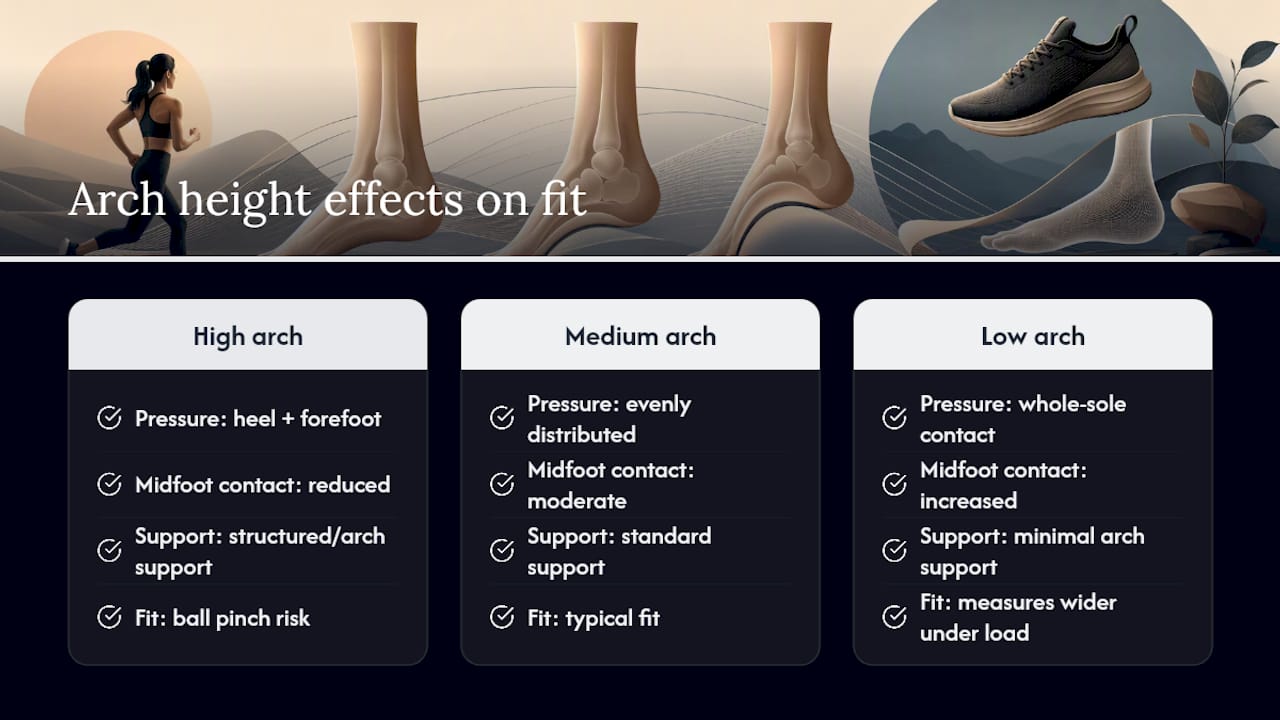
A high arch tends to shift weight onto the heel and forefoot, with less contact through the middle of the foot, which often means the shoe needs more structured support to avoid strain. A flat or low arch spreads weight more evenly and can make a foot look and measure wider than its raw forefoot width suggests, since the whole sole is bearing load. People with notably long arches relative to their toe length are the group where the Brannock device’s heel-to-ball reading earns its keep, since sizing off toe length alone leaves the ball of the foot pinched even in a shoe that’s “long enough.”
Foot shape matters too, separate from arch height. Some feet taper sharply from a wide heel to a narrow toe; others stay close to the same width along most of their length. A shoe last built for one shape will never fit the other comfortably, no matter how precisely you’ve measured length and width individually. This is really why brand-specific size charts matter more than a single universal number, and it’s why two shoes marked as the same size, from different brands, can fit completely differently on the same foot.
Editorial take: why most sizing advice stops one step too early
Most guides get you to a number and stop there, as if a single centimetre figure settles the question. It doesn’t. The research behind this guide points somewhere more useful: the measurement conditions matter almost as much as the measurement itself. A perfectly traced foot measured at 8am, sitting down, in bare feet, gives you a confidently wrong answer.
What’s overrated is precision for its own sake, chasing a LiDAR scan accurate to the millimetre while ignoring that you measured in the morning instead of the evening. What’s underrated is arch length. Most people have never heard of heel-to-ball measurement, yet it explains a disproportionate share of “this shoe is long enough but still feels tight” complaints.
If you take one thing from this: measure both feet, standing, in the evening, in your actual socks, and write the numbers down. Everything else, the fancy scanning apps, the width-letter charts, the Brannock arch reading, is refinement on top of that foundation. Get the foundation right first, and the rest of the sizing process stops being guesswork.
— Panagiotis
Sources
- How to Measure Foot Size 2026 | Podiatrist Guide
- How to Scan Your Feet
- Brannock instructions/fitting tips