
In 5 Minutes, Measure Length and Width to Find Your Shoe Size at Home
Stand up, measure heel-to-longest-toe and ball width at the end of the day wearing your usual socks, then match the larger foot to a brand’s size chart. Do this and you’ll get a shoe size that fits most everyday footwear correctly. Use either the wall method or a paper tracing to capture the numbers, then check them against the specific brand you’re buying.
TL;DR:
- Measure your feet at the end of the day while standing to account for swelling and weight distribution, ensuring the most accurate fit.
- Use a wall method or paper tracing to get precise length and width measurements, checking both feet separately and repeating for consistency.
- Consider width differences, especially for narrow or high-volume feet, since length alone may not guarantee comfort or proper fit.
- Match your larger foot’s measurement against the brand’s specific size chart for the most accurate sizing, not a generic conversion table.
- Always try shoes on in person, using the thumb-width rule and walking around to verify proper fit and avoid pinching or heel slip.
Table of Contents
- When should you measure your feet, and what do you need?
- How do you measure foot length with the wall method?
- How does the paper tracing method work?
- Why does foot width matter as much as length?
- How do you convert your measurements into a shoe size?
- How do you know a shoe actually fits once you try it on?
- Why trust this guide to Ydauk’s sizing method?
- What’s different about measuring children’s feet?
- Do different shoe types need different measurements?
- Can printable tools or apps improve accuracy?
- Should you allow for foot swelling or growth?
- Why does the same size feel different across brands?
- Why measurement consistency matters more than perfection
- Finding the right fit with Ydauk’s sizing support
- Sources
When should you measure your feet, and what do you need?
Timing changes the result more than most people expect. Feet swell through the day as fluid settles downward, so a foot measured at 8am can come out several millimetres shorter than the same foot measured at 8pm. Clarks recommends measuring at the end of the day and while standing, because that’s when your foot is at its largest and most representative of how it behaves after a full day in shoes.
Standing matters just as much as timing. Weight pushes the arch down and spreads the foot slightly, which is exactly what happens when you’re walking around in the shoes you’re about to buy. Measuring while seated gives you a smaller, less accurate number.
Wear the socks you actually intend to use with the shoes. A thick winter sock adds real bulk; a thin dress sock adds almost none. Measuring bare feet for boots you’ll wear with hiking socks sets you up for a tight fit.
You’ll need very little to do this properly:
- A sheet of paper larger than your foot
- A pen or pencil held vertically, not at an angle
- A ruler or tape measure marked in centimetres or millimetres
- A wall or another straight, flat edge
- A hard, flat floor (carpet distorts the tracing)
Measure both feet separately. Almost everyone has one foot slightly longer or wider than the other, and the difference can be enough to shift a size. Consistency in your process, same socks, same time of day, same stance, is what makes the number reliable, so try to repeat these conditions if you remeasure later.
How do you measure foot length with the wall method?
This is the fastest way to get an accurate length reading, and it’s the method recommended by Nike for anyone measuring at home without a Brannock device. It takes about five minutes for both feet.
- Set your baseline. Place a sheet of paper against the base of a wall, with one edge flush against the skirting board or wall itself.
- Position your heel. Stand on the paper with your heel touching the wall directly, weight evenly distributed, and your foot pointing straight ahead.
- Mark the longest toe. This is usually the big toe, but not always, some people have a longer second toe. Make a small mark on the paper at the tip of whichever toe extends furthest.
- Measure the distance. Use your ruler or tape measure to record the distance from the wall to that mark, in centimetres or millimetres for precision.
- Round sensibly. Round to the nearest half centimetre. Most size charts move in roughly 0.67cm increments per full size, so a measurement that falls between two marks usually points you to a half size.
- Repeat for the other foot. Reset the paper and do the same process again. Don’t assume symmetry.
- Do it twice per foot. Measure each foot a second time to check you get the same result within a couple of millimetres. If not, check your stance and try again.
Pro Tip: Keep your knee slightly bent and your weight pushed forward onto the measuring foot when you mark the toe. Standing rigidly straight with weight on your heel alone can shave a couple of millimetres off the true length, which is enough to nudge you into the wrong half size.
Record both numbers, note which foot is longer, and keep the paper. You’ll need it again when you check your reading against a size chart later.
How does the paper tracing method work?
Tracing gives you length and width in one go, which makes it the better choice when you’re sizing more than one person, measuring a child, or don’t have a clean wall to work against.
- Place paper on a hard floor. Carpet lets the paper shift and distorts the outline, so use a kitchen floor, hallway, or similar.
- Stand naturally. Put one foot on the paper with your full weight on it, the other foot flat on the floor beside it for balance.
- Hold the pen vertically. Trace around the entire foot keeping the pen upright against the skin at all times. Tilting the pen inward or outward changes the outline size.
- Mark the extremes. Note the back of the heel and the tip of the longest toe on the tracing.
- Lift your foot and measure. Measure the straight-line distance between your heel and toe marks for length.
- Find the widest point. Locate the ball of the foot, usually just behind the toes, and measure straight across the tracing at its widest point for width.
- Repeat for the second foot.
A few things separate a useful tracing from a wasted one:
- Keep your foot still while tracing; shifting weight mid-trace blurs the outline.
- Trace both feet on separate sheets rather than trying to fit both on one page.
- Label each tracing immediately (left/right, date) if you’re doing this for more than one person.
- Avoid tracing over socks with a chunky heel seam, it can add false width.
Tracing is particularly good for children because it maps the actual footprint shape rather than a single measurement, and it’s easy for parents to repeat every few months without any special equipment. It’s also more forgiving than the wall method if you don’t have a straight edge to work against, though it takes slightly more care to avoid tilt errors distorting the shape.
Why does foot width matter as much as length?
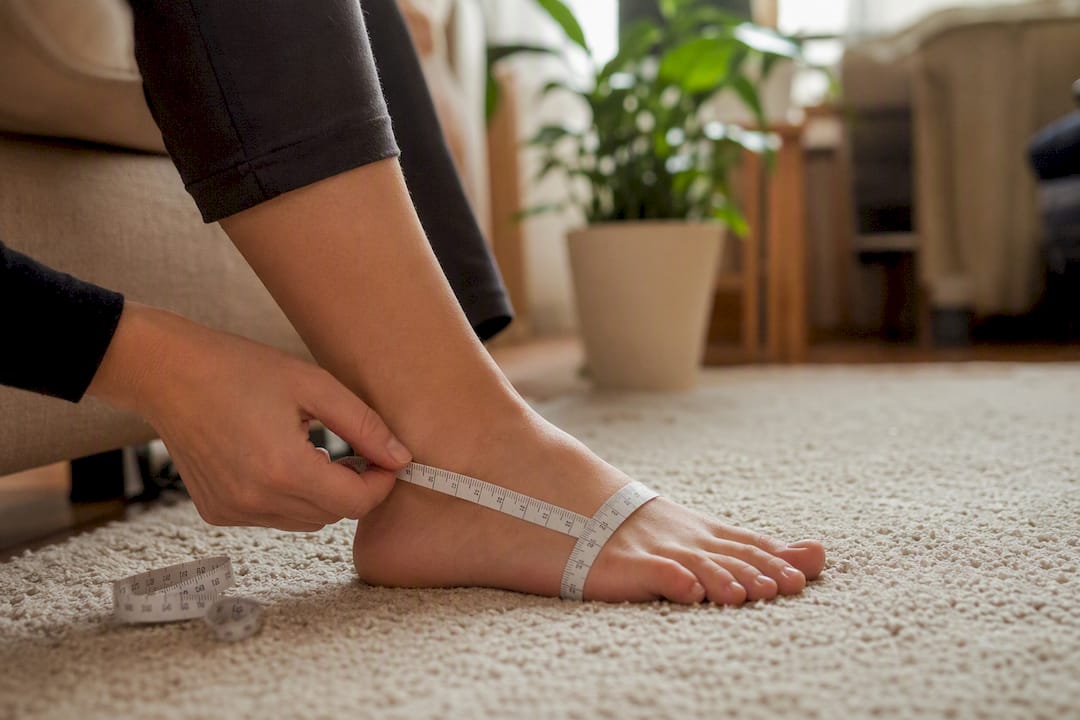
Length gets all the attention, but width is usually where fit actually goes wrong. Ball width, measured across the widest part of the foot while standing, predicts toe-box comfort better than length alone, and skipping it is the single most common reason people end up with shoes that measure “correct” on paper but pinch after twenty minutes.
Measure width the same way you measured length: standing, weight-bearing, socks on. Locate the ball of your foot, the widest point, usually just behind your toes, and measure straight across the tracing or use a tape measure wrapped around that point while standing.
- Ball width is measured across the widest part of the forefoot, not the heel or arch.
- Take this measurement standing, since weight spreads the foot outward.
- Compare your width figure against a brand’s width chart, not just its length chart, if one is available.
- Recheck width if you’ve gained or lost noticeable weight, or during pregnancy, since foot volume shifts more than most people expect.
Many people overlook width entirely, which leads to shoes that fit lengthwise but are too narrow, causing rubbing or blisters within the first few wears.
Arch height and overall foot volume complicate the picture further. A high arch or low-volume foot can feel loose in a shoe that measures correctly, while a flatter, higher-volume foot can feel cramped in the same size. Retailers increasingly flag arch height and volume as factors that push people toward wider models or different lasts altogether, rather than simply a bigger size. If your measured length matches a size but the shoe still feels tight across the midfoot, a wide fit or a different shoe shape is usually the fix, not a longer shoe.
How do you convert your measurements into a shoe size?
Take the larger of your two foot-length measurements and match it against a size chart, ideally the specific brand’s own chart rather than a generic conversion table. Sizing varies by last and by the shoe’s purpose, so a brand’s own chart will always be more accurate than a universal centimetre-to-size formula.
A rough centimetre-to-size guide looks like this for adult sizing, though treat it as a starting point rather than gospel:
Use this table as an orientation point, then check the exact figures on the brand’s own chart, sizing runs differently enough between manufacturers that a “size 8” in one brand can measure a full half size different from another. Ydauk’s shoe conversion chart breaks this down by measurement in more detail if you want exact figures rather than approximations.
A few adjustments worth making before you buy:
- Athletic shoes and running trainers often need half a size more room than dress shoes to allow for foot swelling during exercise.
- Boots, particularly leather ones, tend to loosen slightly with wear, so a snug initial fit is usually fine.
- Thick socks or orthotic insoles can eat up half a size of internal volume, factor that into your choice.
- If you’re between two sizes on a chart, size up rather than down, a shoe that’s slightly roomy is far easier to live with than one that’s tight.
How do you know a shoe actually fits once you try it on?
Measurements get you close, but the final check happens with the shoe on your foot. The thumb-width rule is the simplest test: with the shoe on and laced, you should be able to fit roughly a thumb’s width of space between your longest toe and the front of the shoe. Any pinching across the ball of the foot, or visible bulging at the sides, means the width is wrong even if the length checks out.
- Toe room: a thumb’s width of space at the front, no cramping across the widest part of the foot.
- Heel slip: your heel shouldn’t lift more than a few millimetres when you walk; more than that means the shoe is too big or the wrong shape for your heel.
- Arch alignment: the shoe’s arch support should sit roughly where your own arch is, not noticeably forward or back.
- Walking test: always walk several steps on a hard floor, standing still tells you almost nothing about how a shoe behaves in motion.
If your feet differ in size, always buy to the larger foot. A minor mismatch is easy to correct with an insole or heel grip on the smaller foot, but there’s no good fix for a shoe that’s genuinely too small.
Pro Tip: Try shoes on with both feet and walk around for a full minute, not just a few steps near the mirror. Fit problems that don’t show up standing still, heel slip especially, tend to appear once you’re moving naturally.
Why trust this guide to Ydauk’s sizing method?
This guide draws on measurement practice developed by Panagiotis at Ydauk, built around the same reproducibility principles used across the footwear industry: control the variables (time of day, socks, stance) and the measurement becomes trustworthy. [Panagiotis’s full professional background and credentials]
A Brannock device in a shop remains the gold standard for precision, but a careful home measurement done consistently is entirely sufficient for choosing everyday shoes, and it’s the only option when you’re buying online. Ydauk’s own sizing and technology resources build directly on this approach, pairing accurate measurement with footwear designed around foot health rather than a single standardised last.
[Customer testimonials or case studies demonstrating product effectiveness]
[Internal data on product performance or customer satisfaction]
For a fuller walkthrough with photos, Ydauk’s home measurement guide covers the same steps in more visual detail.
What’s different about measuring children’s feet?
Children’s feet grow fast enough that a measurement taken in September can be wrong by December, so the process needs to happen more often than it does for adults. Every eight to twelve weeks for younger children is a reasonable rhythm; toddlers can outgrow shoes even faster during growth spurts.
Tracing tends to work better than the wall method for children, since it’s harder to get a fidgety child to stand still with their heel flush against a wall than it is to trace around their foot in a few seconds. Do it while they’re standing and weight-bearing if you can manage it, sitting readings run smaller.
Always leave a small growth allowance, roughly the width of a thumb pressed flat, at the end of the shoe rather than sizing exactly to the measured length. Too much allowance is just as much of a problem as too little, though: shoes that are too big change how a child walks and can cause tripping.
Check both feet every time. Growth doesn’t always happen evenly, and a child’s dominant foot for kicking or balance sometimes ends up very slightly larger. Recheck the fit of existing shoes periodically too, pressing a thumb down at the toe end while the shoe is on, rather than assuming a size will last a full season.
Do different shoe types need different measurements?
The core measurement, length and width, doesn’t change between shoe types, but how you interpret it does. Athletic shoes and running trainers need extra room because feet swell during exercise and need space for the toes to splay on impact; going half a size up from your everyday measurement is common practice for running shoes specifically.
Dress shoes and formal footwear are usually built on a tighter, narrower last, so use your exact measurement rather than rounding up, and expect less forgiveness in width than you’d get from a trainer.
Boots sit somewhere in between. Leather boots loosen with wear as the material stretches and moulds to your foot, so a snug initial fit, particularly across the instep, is normal and expected to ease over the following few weeks. Insulated winter boots need extra internal volume for thick socks, so measure with those specific socks on rather than your usual thin pair.
Sandals and slip-on styles rely more heavily on width and volume than length, since there’s no lacing to adjust fit; if you’re between sizes, prioritise the width measurement over length for these.
Can printable tools or apps improve accuracy?
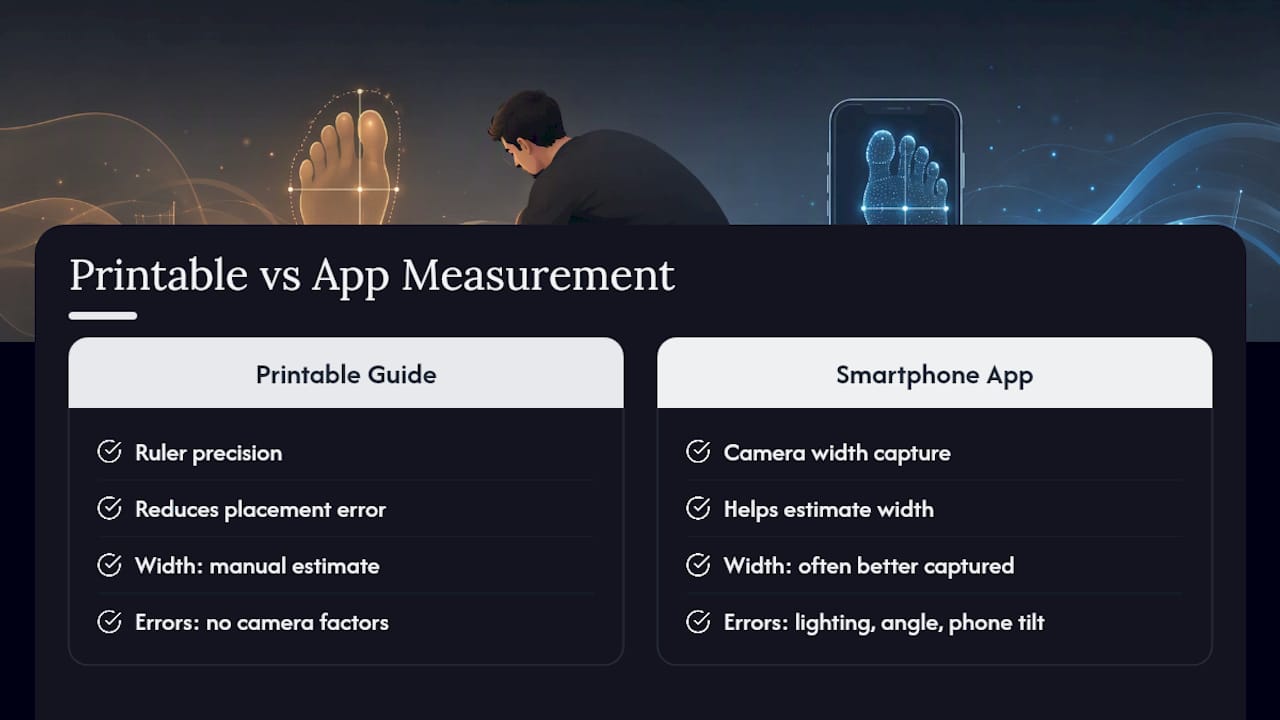
Printable foot-measuring guides, usually a sheet with pre-marked centimetre lines you print at actual size and stand on, remove one of the biggest sources of error in the wall and tracing methods: inconsistent ruler placement.
Smartphone apps that use the camera to estimate foot dimensions have become more common, and they can be a reasonable supplement to a manual measurement, particularly for capturing width, which is harder to gauge precisely with a ruler alone. They’re not infallible: lighting, camera angle, and how flat the phone sits relative to the floor all introduce their own errors, so treat an app’s output as a cross-check against your manual measurement rather than a replacement for it.
Whichever tool you use, the same rules from earlier still apply: measure standing, at the end of the day, in the socks you intend to wear. A printable guide or an app doesn’t fix bad conditions, it just makes the ruler part more precise. For a written walkthrough alongside these tools, Ydauk’s step-by-step home measurement guide covers the manual process these tools are meant to support.
Should you allow for foot swelling or growth?
Adult feet don’t stop changing shape entirely, they swell during the day, during pregnancy, in hot weather, and gradually with age as ligaments and arches lose some of their tension. This is exactly why the end-of-day measurement matters so much: it already captures the swollen, larger state your foot reaches under normal daily conditions.
Beyond daily fluctuation, it’s worth remeasuring roughly once a year as an adult, or sooner after any major change: significant weight gain or loss, pregnancy, a period of much higher activity levels, or a foot injury that’s altered how you stand or walk. Feet do genuinely grow slightly in width and length across adulthood for a meaningful share of people, often without anyone noticing until a once-comfortable pair starts to pinch.
For anyone managing a condition like diabetes, swelling can be more pronounced and less predictable, which makes room in the toe box and a wider fit particularly important rather than optional. Buying to a slightly generous measurement, rather than the tightest size that technically fits, gives your feet room to move through their normal daily range without the shoe feeling too small by evening.
Why does the same size feel different across brands?
A UK size 8 in one brand and a UK size 8 in another can differ by close to half a centimetre in actual length, because each brand designs around its own “last,” the foot-shaped mould used to build the shoe. There’s no universal standard enforcing consistency across manufacturers, which is precisely why matching your measurement to a brand-specific chart matters more than memorising a single number.
Style changes the fit within a single brand, too. A brand’s running trainer and its dress shoe can be built on different lasts even though both are labelled the same size, because the two shoes solve different problems: one needs room for swelling and impact, the other needs a close, tailored fit. Wide-fit and standard-fit versions of the same shoe are effectively different lasts sharing a size label.
This is the strongest argument for keeping your own measurement, length and width, on file rather than relying on remembering “I’m a size 9.” A recorded centimetre measurement translates across brands; a remembered size number often doesn’t. When you’re checking sizing before buying, Ydauk’s guide to finding your shoe size walks through matching your own measurement against varying brand lasts in more detail, and it’s worth the two minutes before checkout rather than guessing from a previous purchase.
Why measurement consistency matters more than perfection
Feet aren’t fixed. They shift with age, activity, weight, and life stage, so I’d rather see someone remeasure once a year, or after anything major like a pregnancy or a big change in activity levels, than trust a number from a decade ago. The wall and tracing methods aren’t lab-grade precision, but done the same way every time, they’re accurate enough for almost every everyday shoe. Always size to the larger foot, and always cross-check against the specific brand’s own chart before you buy.
— Panagiotis
Finding the right fit with Ydauk’s sizing support
Getting your measurements right is only half the job, matching them against the correct shoe design is the other half, and that’s where a lot of people lose the benefit of careful measuring. Ydauk builds its footwear around foot health technology from the outset, which means the fit advice you get is tied to how a specific shoe is actually constructed, not a generic size label.
Once you’ve got your length and width figures, Ydauk’s shoe conversion chart turns them into an exact recommendation across UK, EU, and US sizing, and the fit checklist helps you double-check the result before you commit. If your measurements sit between sizes, or you’re choosing between a standard and wide fit for a specific style, Ydauk’s customer service team can talk you through the right call for your foot shape and the shoe you’re considering, including options built for wider feet or higher arches. Browse the current Ydauk range with your measurements to hand, and you’ll land on the right size on the first order rather than the second.
Sources
- Feet Measurement Guide | How to Measure Your Foot - Clarks
- Nike
- How to measure foot size - Ann Arbor Running Company