
Blister Free in 2 to 4 Weeks: Break In New Shoes With Podiatrist Tips
The fastest safe way to break in new shoes is to confirm they actually fit before you do anything else, then wear them in short, progressive stints while treating hotspots with padding rather than force. Skip the freezer tricks and the “walk it off” advice. Most shoes need 2 to 4 weeks of gradual wear to settle properly, and rushing that process is how avoidable blisters and foot pain happen.
TL;DR:
- Shoes should be measured with a thumb-width of space at the toe and fit securely at the heel before starting the break-in process.
- Leather shoes need gentle softening, while canvas and synthetics stretch less and often only require insoles for size issues.
- Gradually increase wearing time over 2 to 4 weeks, with a focus on short outdoor errands and avoiding pushing from 30 minutes to full days abruptly.
- Using tools like stretchers and light conditioners can help but only when matched correctly to the material and with restraint.
- Persistent discomfort or slipping after several weeks indicates a poor fit that may require professional adjustment or replacement.
Table of Contents
- Your first 72 hours: a quick checklist
- How leather, suede, canvas and synthetics break in differently
- A day-by-day break-in schedule that actually works
- Stretchers, sprays, heat and conditioners: what actually helps
- Fixing heel rub, toe pinch and blisters fast
- Preventing friction while your shoes adapt
- When to stop trying and return the shoes
- What podiatrists and shoe fitters actually recommend
- What I check first when I try on a new pair
- Choosing shoes engineered to need less breaking in
- Sources
- FAQ
Your first 72 hours: a quick checklist
Before you commit to a new pair, run through this in the first three days:
- Measure feet in the afternoon, when they’re at their largest, and check for a thumb-width gap between your longest toe and the shoe’s end.
- Confirm your heel sits securely with minimal slip; a little movement is normal, but the shoe shouldn’t gape.
- Wear the shoes indoors for 30 to 60 minutes on day one, then inspect both feet for red or tender patches.
- Apply heel grips or moleskin to any rubbing spot immediately, and switch to a slightly thicker sock if the upper feels tight.
- Keep hydrocolloid blister plasters on hand before you leave the house in them for longer stretches.
- Hold off on full-day wear until any discomfort from the previous session has fully gone.
- Note where pressure kept recurring. A pattern after two or three wears tells you far more than a single sore spot.
How leather, suede, canvas and synthetics break in differently
Not all uppers respond the same way, and treating a canvas trainer like a pair of leather brogues wastes effort and risks damage.
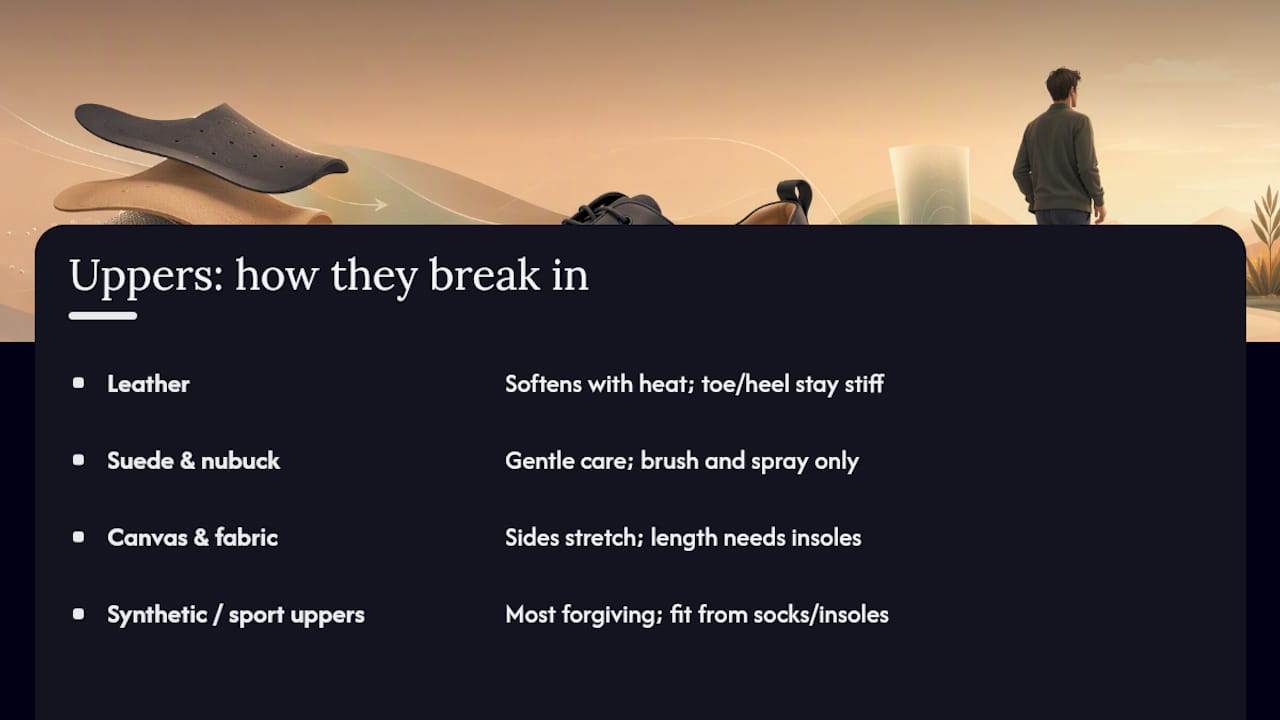
Leather softens well with a combination of body heat, light hydration and conditioner, but the toe box and heel counter are usually reinforced and won’t reshape much no matter what you do. Suede and nubuck need a gentler hand. Skip heavy conditioners, which flatten the nap, and stick to suede-specific brushes and protective sprays. Canvas and fabric shoes stretch a little at the sides but rarely at the toe, so if length is the problem, an insole solves it faster than any stretching attempt. Synthetic and sport uppers are the most forgiving; sneakers typically need far less breaking in than leather dress shoes, and most fit issues here come down to sock thickness or the right insole rather than the material itself.
A day-by-day break-in schedule that actually works
Progress in stages, not leaps. Jumping from twenty minutes to an eight-hour shift is exactly the shortcut that causes damage.
- Days 1 to 3: Wear the shoes at home for 30 to 60 minutes at a stretch, ideally on a soft floor. Check your feet after every session.
- End of week 1: Extend to short outdoor errands, an hour or two at most, and start rotating in any targeted padding you identified during the checklist stage.
- Weeks 2 to 3: Increase to half-day wear if there’s no lingering soreness. Add cushioned insoles or heel grips now if any pressure point is still showing up.
- Week 4: Attempt a full day. If the shoe still pinches or rubs at this point, that’s a signal worth listening to, not pushing through.
Expect the overall process to take 2 to 4 weeks for most footwear to feel genuinely comfortable across a full day. Athletic shoes tend to move faster through this schedule than structured leather styles, and board certified surgeons note that patience beats speed, since rushing the process is one of the more common causes of avoidable foot pain. If soreness gets worse rather than better by week two, stop the schedule and get the fit checked by a cobbler instead of continuing.
Stretchers, sprays, heat and conditioners: what actually helps
Off-foot methods can speed things along, but only when matched to the shoe’s material and used with restraint.
- A shoe stretcher with width plugs handles a snug-fitting toe box; the two-way version adjusts length as well, and it’s the safer route for a shoe that’s uniformly tight rather than pinching in one spot.
- Leather conditioner softens stiff hide, but patch-test it first on an inconspicuous area and apply a small amount. Over-conditioning weakens the leather’s structure over time just as easily as too much heat does.
- A hairdryer on a low, warm setting held a few inches from a tight spot for thirty seconds, then flexed by hand, softens leather without scorching it. What you should never do is freeze the shoes in water or drive over them; both methods are popular online and both risk permanently distorting the shoe.
- If a shoe still doesn’t move after a proper stretcher session, that’s the point to hand it to a professional cobbler rather than keep forcing it yourself. Our guide to softening new leather shoes covers the conditioning process in more depth.
Fixing heel rub, toe pinch and blisters fast
Different pressure points need different fixes, and matching the right one to the right spot saves days of discomfort.
- Heel rub: Stick heel grips or a thin strip of moleskin to the inside back of the shoe, and try lacing one hole tighter to lock the heel in place. If slippage is severe or the heel counter itself digs in, that’s a job for a cobbler, not a plaster.
- Toe pinch: A toe-box stretcher widens the front gradually over a day or two, and a thinner insole occasionally buys a few extra millimetres of room. Wearing two thin socks briefly can also cushion a tight spot while the shoe settles.
- Blisters: Moleskin works best on flat areas before a blister forms; once skin has broken, a hydrocolloid plaster protects and speeds healing far better. Seek medical attention if a blister shows spreading redness, warmth, or pus. That’s a sign of infection, not just friction.
Preventing friction while your shoes adapt
The right socks and insoles do more preventative work than most people give them credit for.
- Choose socks with some cushioning at the heel and ball of the foot, and check seam placement near the toes if you’re prone to pinching there.
- Gel pads and temporary insoles reduce friction well, but a pad that’s too thick can push your foot forward and recreate the toe-crowding problem you were trying to avoid.
- Keep feet dry with a light foot powder, rotate socks during the day if you sweat heavily, and let shoes air out fully between wears rather than reaching for the same damp pair twice in a row.
Simple problem-solving products like moleskin, gel pads and heel grips reduce friction enough to make wearing shoes through the adjustment period far more bearable.
When to stop trying and return the shoes
Some fit problems aren’t a break-in issue at all. Sharp, stabbing pressure, numbness that doesn’t fade shortly after removing the shoe, or a heel that lifts more than about 3 millimetres on every step point to a shape mismatch no amount of wearing-in will solve.
Give a pair a fair two to four weeks on the staged schedule above before making that call. If nothing’s improved by then, your realistic options are an exchange, a cobbler alteration for something fixable like heel slip, or trying a different last or width entirely. Persisting past that point rarely ends well; it usually just adds a bruised toenail to the list.
What podiatrists and shoe fitters actually recommend
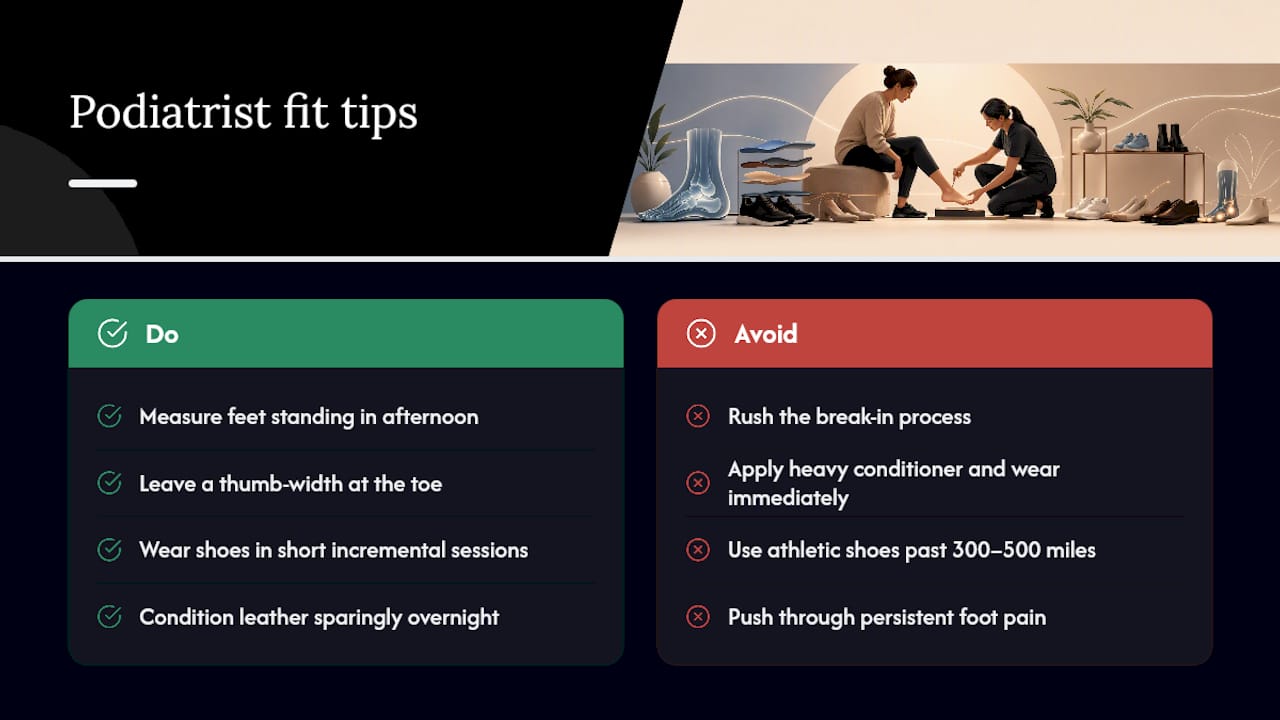
The fitting advice that holds up under scrutiny is fairly consistent. Podiatrists recommend measuring feet while weight-bearing in the afternoon, leaving a thumb-width of space at the toe, and expecting the settling process to take 2 to 4 weeks for many styles. That single measurement habit prevents more fit problems than any break-in trick that follows it.
Rushing the break-in process is one of the more common causes of avoidable foot pain, according to expert commentary cited in coverage of shoe comfort. Patience and small, incremental wear sessions build a fit that actually holds.
Pro Tip: Condition leather sparingly and give it time to absorb before wearing the shoes again. A thin layer worked in overnight beats a heavy application you’re forced to wear the same day.
Athletic shoes are the one exception worth flagging. Breaking them in before intense activity genuinely helps, but the same midsoles lose their cushioning after roughly 300 to 500 miles, so no amount of care extends a worn-out shoe indefinitely. Persistent pain at any stage calls for a professional assessment rather than pushing through another week of wear.
What I check first when I try on a new pair
Three things, always: room at the toe, heel grip when I walk a few steps, and whether pressure builds or fades within a minute of standing still. If a shoe fails any of those in the shop, no amount of home break-in fixes it.
I’d steer well clear of the freezer bag trick and anything involving driving over your shoes. The staged plan works because it respects how materials actually behave, not because it’s the exciting option.
— Panagiotis
Choosing shoes engineered to need less breaking in
A properly engineered shoe shouldn’t need weeks of coaxing to feel right. Some footwear is built around foot health technology designed to stabilise and support each step from the first wear, aiming to provide fit precision that may reduce the blister-prone break-in period covered above.

That’s not a promise that every shoe fits every foot instantly. Fit still matters, and the checklist above still applies to any new pair. But starting with a shoe designed around comfort and energy efficiency, rather than one that simply looks good, means fewer hotspots to manage in week one. If you want the technical detail behind how that’s engineered, the technology behind YDA shoes page explains the foot health approach in full. Ready to see the range itself? Browse Ydauk’s high performance footwear and check sizing against the fit rules in this guide before you order.
Sources
- How to Buy the Right Shoes: A Podiatrist Guide
- How to make shoes more comfortable (RealSimple / Dr Damian Roussel)
- How to properly break in shoes | Wirecutter
- The Art and Science of Breaking In Your Shoes | Valet
FAQ
Is there a tool to break in shoes?
Yes, a shoe stretcher is the main tool, using width plugs for a tight toe box or a two-way version for both length and width. Stretch sprays and a hairdryer on low heat can soften leather further, but none of these replace a proper fit check first.
How many hours does it take to break in shoes?
There’s no single number, since it depends on material and fit, but most shoes need 2 to 4 weeks of gradual, staged wear to feel fully comfortable. Synthetic and sport shoes typically settle faster than structured leather styles.
How do I break in my new shoes?
Start with short indoor wears of 30 to 60 minutes, check for hotspots afterwards, and extend wear time gradually over several weeks rather than jumping straight to a full day. Treat any rubbing immediately with moleskin or heel grips rather than pushing through it.
Is breaking in shoes painful?
It shouldn’t be. Some mild pressure while a shoe settles is normal, but sharp pain, numbness, or repeated blistering means the fit is wrong rather than something that will resolve with more wear. If discomfort persists past two to four weeks of gradual wear, that’s the point to return the shoes or see a cobbler.