Footwear making: a complete guide for enthusiasts
TL;DR:
- Footwear making is more accessible than often assumed, combining materials science, design, and craft.
- Understanding key techniques, materials, and documentation enables beginners to produce quality shoes and innovate sustainably.
Most people assume footwear making is something reserved for factories in Guangzhou or bespoke cobblers with 40 years of bench experience. Neither is entirely true. Footwear making sits at the intersection of materials science, design logic, and hands-on craft. Whether you want to understand how your favourite pair was constructed or you’re planning to make footwear yourself, the process is more accessible than it appears. This guide covers everything from materials and construction techniques to design documentation, sustainability trends, and practical advice for getting started.
Table of Contents
- Key takeaways
- Materials used in footwear making
- Core shoe crafting techniques explained
- From design concept to manufacturing
- Sustainability and innovation in footwear
- Getting started: advice for beginners
- My perspective on the craft
- Discover Ydauk’s approach to footwear technology
- FAQ
Key takeaways
| Point | Details |
|---|---|
| Materials shape everything | Your choice of upper, sole, and lining material directly affects comfort, durability, and finished style. |
| Craftsmanship takes real time | Artisanal shoe construction can take 10 to 12 days per pair, far beyond most beginners expect. |
| Tech packs prevent costly mistakes | A thorough footwear tech pack with 8 to 12 sections translates your design into factory-ready instructions. |
| Sustainability is now standard | Upcycled footwear models like Greensole’s 80/20 material ratio show eco-production is viable at scale. |
| Beginners can start small | Learning on simple silhouettes like sandals or moccasins builds foundational skills before tackling complex constructions. |
Materials used in footwear making
The materials you choose define almost every characteristic of a finished shoe. Understanding each component’s role is the starting point for any serious footwear enthusiast.
Uppers are the most visible part and can be made from:
- Full-grain leather: the most durable and breathable option, preferred in quality dress and work boots
- Corrected-grain leather: buffed and coated for a uniform look, more affordable and common in mid-market footwear
- Textiles (canvas, mesh, nylon): lightweight, flexible, and ideal for trainers and casual shoes
- Synthetics (PU, microfibre): cost-effective, consistent in quality, and increasingly popular as vegan alternatives
Soles come in outsole and midsole layers. Rubber outsoles offer grip and weather resistance. EVA foam midsoles cushion impact. Leather outsoles are traditional and found in dress shoes but wear faster on wet surfaces.
Insoles and linings sit inside the shoe. Insoles provide underfoot support and are sometimes removable for orthotics. Linings in leather or textile wick moisture and reduce friction against the skin.
Hardware and adhesives complete the picture. Metal eyelets, buckles, and zips add function and visual detail. Construction adhesives, when used correctly, bond outsoles with strength that rivals stitching in certain applications.
Sustainable materials are gaining serious ground in the footwear production process. Brands and independent makers are now using recycled PET, natural cork, plant-based leather alternatives (including cactus and apple peel), and bio-rubber. You can read about how these materials intersect with retail design on the Ydauk guide to sustainable footwear.
Pro Tip: When sourcing leather for your first project, opt for vegetable-tanned leather over chrome-tanned. It is stiffer initially but moulds to the last more reliably and ages beautifully with wear.
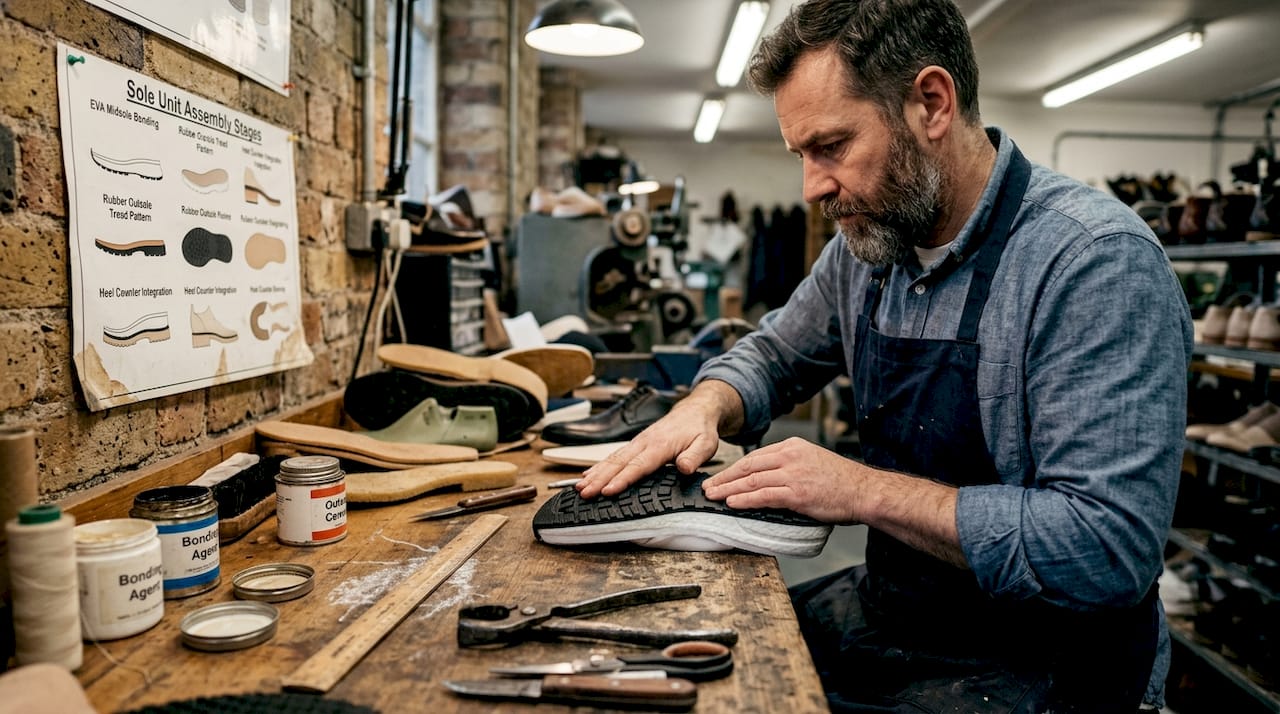
Core shoe crafting techniques explained
Understanding the sequence of footwear production helps you appreciate both the skill involved and the decisions made at each stage.
-
Pattern making and cutting. Before any material is touched, flat 2D patterns are drafted from a last (the foot-shaped mould around which shoes are built). Patterns account for seam allowance, stretch, and grain direction. Leather and fabric are then cut using steel-rule dies or hand knives.
-
Closing (stitching the upper). The cut pieces are stitched together to form the upper shell. This stage is called “closing” and requires consistent tension, clean seam alignment, and appropriate thread weight for the material.
-
Lasting. This is where footwear making gets genuinely difficult. The upper is pulled tightly over the last and secured to the insole board using tacks, staples, or adhesive. Hand-lasting requires spatial awareness and tension control in multiple directions simultaneously. Even advanced machinery struggles to replicate what a skilled laster achieves with pliers and precision.
-
Sole attachment. Once lasted, the outsole is attached by cementing, stitching, or moulding. The three main stitching constructions are:
- Blake stitch: a single line of stitching through insole, upper, and outsole. Sleek and flexible, common in Italian dress shoes.
- Goodyear welt: an extra strip of leather (the welt) is stitched between the upper and outsole, creating a durable, resoleable construction.
- Cementing (direct gluing): the dominant method in mass production. Fast and cost-effective, but shoes cannot be resoled.
-
Finishing. Edge painting, heel stacking, sole burnishing, lacing, and final inspection bring the shoe to a wearable state.
The time involved is significant. Handmade embroidered Vietnamese shoes take 10 to 12 days per pair from material sourcing through to final assembly. At the luxury end, metal-wrapping embellishments on a single shoe component can take up to 35 hours. These figures reframe what “handmade” actually means.
Pro Tip: Practice your lasting technique on cheap synthetic fabric before cutting into leather. The pulling force required surprises most beginners, and wasted leather is an expensive lesson.
From design concept to manufacturing
Custom shoe design does not begin with a sketch. It begins with understanding your last. The last determines the toe shape, heel height, instep volume, and overall fit. Every design decision flows from it.
Once the concept is formed, the production process moves into documentation. A footwear tech pack is the primary document that translates your design into manufacturing instructions. A well-built tech pack includes technical drawings, a Bill of Materials, construction method specifications, grading tables, and branding placement details. Skipping or skimping on this document is the most common reason DIY shoe making projects fail at the production stage.
Prototyping approaches compared
| Method | Best for | Limitations |
|---|---|---|
| Hand-cut paper/cardboard mockup | Quick shape testing | No material feedback |
| Fabric toile | Fit and volume testing | Not structurally accurate |
| Clay sculpting | Expressive, organic shapes | Requires 3D scanning to convert |
| CAD modelling | Precise technical documentation | Can lose artistic spontaneity |
| 3D-printed prototype | Rapid iteration on fit geometry | Material properties differ from final |
One of the more interesting recent approaches involves starting in clay. Designers sculpt directly around a foot model, then 3D-scan the result to generate digital files for printing or pattern extraction. This method preserves organic, anatomical curves that CAD workflows often smooth away.

Grading is the final technical step before production. This involves scaling the base design across the full size run, adjusting proportions at each increment so the shoe fits correctly at a UK 4 and a UK 11 without distortion.
A thorough tech pack reduces factory assumptions and improves communication across every stage of production. It is not optional if you want consistent output.
Sustainability and innovation in footwear
The US footwear manufacturing industry has contracted steadily, recording a 6.3% CAGR decline between 2021 and 2026. That pressure has pushed brands to rethink their production models, not just their marketing.
Upcycling is one of the most practical responses. Greensole, founded by Mumbai runners, standardises footwear upcycling using an 80/20 material ratio: 80% recovered material to 20% new material added for hygiene and structural integrity. They have donated 1.2 million pairs to children. That is a model, not just a story.
Key emerging trends reshaping how footwear is made:
- 3D printing now enables direct-to-foot sole geometry, reducing waste from cutting and trimming
- AI-assisted design speeds up trend forecasting and grading, cutting development cycles by weeks
- Plant-based and bio-sourced materials are moving from concept to commercial availability at scale
- Modular construction allows individual components to be replaced rather than discarding the entire shoe
The challenge is balancing these technologies with wearability. A 3D-printed midsole can be geometrically perfect but feel wrong on the foot if material hardness is miscalculated. Human-centred testing remains irreplaceable, regardless of what the software predicts. Ydauk’s overview of footwear innovations in 2025 covers several of these developments in practical terms.
Getting started: advice for beginners
Starting in footwear making without a plan is how most beginners end up with a pile of expensive materials and nothing wearable. Here is what actually helps:
- Start with sandals or moccasins. Both have minimal construction complexity. A simple leather sandal teaches you pattern transfer, cutting, and hand-stitching without the lasting challenge of a closed shoe.
- Buy a second-hand last before anything else. You cannot make a well-fitting shoe without one. Wooden lasts are ideal; plastic ones work for practice.
- Invest in proper tools early. A sharp skiver, bone folder, lasting pliers, and a stitching groover are the tools that separate clean work from frustrating work.
- Learn to skive (thin leather edges) before stitching. Unskived seams create uncomfortable ridges inside the shoe and do not close cleanly.
- Find a workshop or short course. Online tutorials cover the theory, but watching tension management and lasting technique in person accelerates learning considerably.
- Expect to make two or three unwearable pairs first. This is normal. The learning is in the failure, not despite it.
Common pitfalls include choosing the wrong adhesive for your sole material, cutting patterns off-grain on leather (which causes distortion under stress), and underestimating how much thread tension affects seam strength.
My perspective on the craft
I have spent years looking at how shoes get made, from factory floors to small workshops operating out of converted garages. What strikes me consistently is this: the craft is not dying. It is being redefined.
The conventional view holds that handmade shoes are a luxury product for people with money to spend. That framing misses something. What hand production actually offers is feedback. Every pull on a lasting plier, every resistance from the leather, tells you something a machine cannot tell you. That feedback loop is where real skill develops, and it cannot be replicated in a factory setting or a CAD programme.
What I find genuinely exciting right now is the convergence of traditional handcraft with tools like 3D scanning. The clay sculpting approach referenced earlier is a perfect example. You are not abandoning artistry for technology. You are using technology to capture and preserve artistry that would otherwise be impossible to scale. That strikes me as the most honest version of where the footwear production process is heading.
My honest advice: do not wait until your skills feel “ready.” Pick up a piece of leather and a skiver, make something small, and accept that it will not be perfect. The people who get good at this craft are the ones who made a lot of bad shoes first.
— Panagiotis
Discover Ydauk’s approach to footwear technology
If this guide has sparked your curiosity about what is possible in footwear design, Ydauk has taken many of these principles and built them into a purposeful product range.

Ydauk’s focus on foot health and energy-efficient design draws directly from the kind of deep craft knowledge covered throughout this article. The YDA shoe technology page details how the brand approaches sole construction, material selection, and ergonomic design, making it a genuinely useful reference point whether you are a maker, a designer, or simply a thoughtful buyer. If you want to see how production principles translate into wearable performance, that is the place to start.
FAQ
What materials are best for beginner footwear making?
Vegetable-tanned leather and canvas are the most forgiving materials for beginners. Both are relatively easy to cut cleanly, hold stitching well, and respond predictably during lasting.
What is the difference between Blake stitch and Goodyear welt?
Blake stitch uses a single thread through the insole, upper, and outsole for a slim, flexible result, while Goodyear welt adds an extra leather strip between layers, creating a more durable and resoleable construction.
How long does it take to make a pair of shoes by hand?
It depends on the construction complexity. Simple sandals can be completed in a day, while fully crafted closed shoes with embellishment can take 10 to 12 days or considerably more at the artisanal luxury level.
What is a footwear tech pack and do I need one?
A footwear tech pack is a technical document containing drawings, material specifications, construction methods, and grading details. If you plan to work with any manufacturer or external maker, a proper tech pack is the single most important document you will create.
Can 3D printing be used in custom shoe design?
Yes. 3D printing is used both for prototyping fit geometry and for producing final components such as midsoles and heel structures. Designers now sometimes begin with a clay sculpture, then 3D-scan and print from the digital file to retain organic forms.